4.1.2 Navigating Help

| Previous | Contents | Index |
DECwindows applications let you perform many basic tasks the same way. For example, Mail and FileView display the same dialog boxes for printing files and mixing colors. This chapter describes the following commonly used DECwindows tasks.

You can get help in any DECwindows application by using the Help menu. The Help system provides brief information about screen objects, concepts, system messages, or tasks you can perform in applications. Some applications also let you get help on specific screen objects---for example, scroll bars and menu items---by using the Help key and MB1.
Help is designed to let you request general information on an application and quickly narrow the focus of your inquiry. In Help, you can
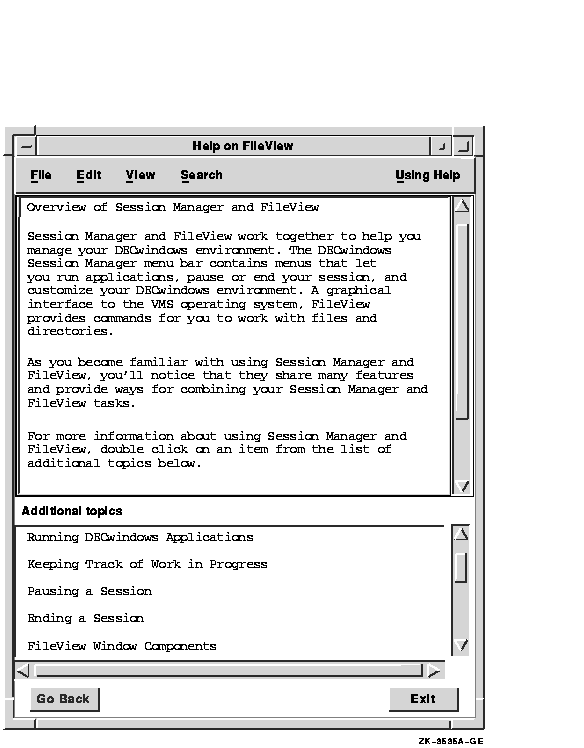
To get help about tasks in any application, choose On Window from the application's Help menu.
A Help window opens with the On Window topic displayed. The On Window topic includes a list of additional topics that explain how to do common tasks.

To get help about screen objects such as menu names, scroll bars, system messages, and dialog boxes in most applications:
You can display product information about your application, such as the copyright notice, by choosing On Version from the application's Help menu. In some applications, the Help menu also contains a Glossary menu item, which you can use to look up terms specific to your application.
For more information about using Help, choose On Window from the Using
Help menu in each application's Help window.
4.1.2 Navigating Help

When you select a topic from the Additional topics list in the On Window window, you start down a path that is limited only by your own curiosity. You can follow a path of topics by continuing to select additional topics or by retracing your steps and branching off to a different topic. You can also return to the On Window topic and start down another path.
To display an additional topic:
For still faster navigation, double click on the topic you want. Double clicking on a topic is a shortcut for selecting the topic and choosing Go To.
Help displays the selected topic. You can continue to select other topics from the list of additional topics or redisplay the topic you last saw by clicking on the Go Back button.
To display the current topic and a new topic simultaneously:
Instead of replacing the current help topic with the new topic, another Help window opens displaying information about the new topic. You can then explore other topics from the new Help window and keep the current topic open for reference.
To see the path you followed to get to your current topic:
When you finish looking at a topic and want to close the Help window,
click on the Exit button. To return to the On Window topic, choose Go
To On Window from the View menu in any Help window.
4.1.3 Searching Help for Titles and Keywords

You can search help for words or phrases to see whether they appear in topic titles or in Help text. For example, you might want to see whether a Mail topic title contains the word Sending, or you might want to find the topics in which the word message appears.
To search for a word or phrase contained in a topic title:
To display the topic whose title contains the word or phrase you searched for, double click on that topic. The Search Topic Titles dialog box remains open for you to continue your topic search.
Help for each application allows you to search for predefined words or phrases called keywords. To search for a keyword that is used in a topic:
To display the topic that uses the keyword, double click on that topic.
Help displays the topic that is related to the keyword in the Topic
Titles list box. When you double click on the topic title of the
keyword you want to see, Help displays the topic in another window. The
Search Topic Keywords dialog box remains open for you to continue your
keyword search.
4.1.4 Saving Help Text in a File

You can select text from a help topic and save it in a file. This lets you print the file for later reference or mail it to another user.
To select text from a topic and save it in a file:
To exit Help, click on the Exit button. If you have multiple Help
windows open, you must close each one.
4.2 Editing Text

DECwindows provides many ways to edit text, which save you from retyping long file names or large blocks of text. Most applications, including the desktop applications, let you move and copy text
In addition, most applications provide an Edit menu that allows you to cut, copy, and paste text and graphics. For more information about using the Edit menu in specific applications, see the DECwindows Motif for OpenVMS Applications Guide.
Finally, most applications define specific keys to let you perform
basic text editing. These keys, described in Section 4.2.5, let you move
the cursor and delete small amounts of text efficiently.
4.2.1 Selecting Text
Before you can copy or move text to other locations within a window or between windows, you must select the text. You can copy text in any increment, including a word, a line, or a paragraph at a time. Repeatedly clicking MB1 increases the amount of text you select. In other words, every time you press MB1, you select more text.
The following table describes how to select text.
| To | Do this |
|---|---|
| Position the cursor where you want the selection to start | Point to the location and click MB1. |
| Select a word | Point to the word and double click MB1. |
| Select a line | Point to the line and triple click MB1. |
| Select continuous text, from the original selection point to the point where the button is released | Press and hold MB1 and drag the pointer through the text. |
| Extend the current selection | Simultaneously press and hold the Shift key and MB1 while dragging the pointer through the additional text. |
| Extend the current selection to where the pointer is positioned | Press and hold the Shift key and click MB1. |
In addition, some applications provide a way for you to select larger blocks of text at a time. For example, you can select an entire mail message by pointing to the text and clicking MB1 five times.
You can select only one piece of text at a time. By selecting text in
one application, you cancel any other text selection established in the
same window or in another application.
4.2.2 Copying Text
If you can type text in a window, you can select and copy that text from one place to another in the same window, between windows of the same application (between Mail's main window and the Create--Send window, for example), or between different applications.
You can also copy text from a FileView window---including FileView's file list---into an application that supports text entry.
To copy text in a window, between windows in the same application, or between applications:
Some applications use different methods for copying text. See each application's manual for an explanation of how to copy text in that application.
The window from which you selected the text takes input focus. If you copied that text back to the window you were working in, you had to reestablish input focus for that window. Sometimes, however, you just want to grab a piece of text from another window without worrying about which window has input focus. That's where the QuickCopy feature comes in handy: You can quickly copy text from another window to your current window without losing input focus in your current window.
To use QuickCopy:

DECwindows also lets you work in one window, select text from another, and move that text to the current window without losing input focus in your current window. The text is deleted from its original location.
To move text from one window to another:
Some applications use different methods for moving text. See each
application's manual for an explanation of how to move text in that
application.
4.2.4 Deleting Text with Pending Delete
When you mark text for pending delete, you can delete large blocks of text with one keystroke instead of pressing the <X| key repeatedly. You mark text for pending delete by selecting it as described in Section 4.2.1. The selected text is deleted when you press any key. You can then type new text.
To cancel a pending delete selection (once you select the text but
before you press a key), point to the selected text and click MB1.
4.2.5 Text Editing Key Definitions
You can use the text editing techniques described in the following table to move the cursor or delete text in most DECwindows applications. Use the arrow keys to move the cursor one character at a time.
| To | Press |
|---|---|
| Move the cursor to the next word | Shift+right arrow keys. |
| Move the cursor to the previous word | Shift+left arrow keys. |
| Move the cursor to the beginning of the line | F12 key or Ctrl+H keys. |
| Move the cursor to the end of the line | Shift+F12 keys or Ctrl+E keys. |
| Move the cursor forward between entry boxes | Tab key. |
| Move the cursor backward between entry boxes | Shift+Tab keys. |
| Delete the characters to the left of the cursor up to and including the beginning of the word | F13 key or Ctrl+J keys. |
| Delete the characters to the right of the cursor up to and including the end of the word | Shift+F13 keys. |
| Delete the character to the left of the cursor and move all text to the right of the deleted character one space to the left | < X| key. |
| Delete the character after the cursor and move all text to the right of the deleted character one space to the left | Shift+< X| keys. In overstrike mode, Shift+< X| deletes the character under the block cursor. |
| Delete all characters to the start of the line | Ctrl+U keys. |
| Refresh the window | Ctrl+R keys. |
In DECwindows, you can use compose sequences to create special characters. A compose sequence is a series of keystrokes that creates characters that do not exist as standard keys on your keyboard. See the list of multinational character and ISO Latin 1 compose sequences in the OpenVMS DCL Dictionary.
Depending on the keyboard type, you compose characters in one of the following ways:
To compose a character using the list of compose sequences in Appendix A in the DECwindows Motif for OpenVMS Applications Guide:
To cancel a compose sequence, press and hold the Compose key while you press the space bar, or press the <X| key, Tab key, Return key, or Enter key.
See the DECwindows Motif for OpenVMS Applications Guide for information about composing characters in
DECterm.
4.4 Printing Files

DECwindows allows you to print the files that you create and work with in applications. For example, you can print a mail message or a drawing you created in Paint. This section describes how to print files.
Whenever you choose the Print command in an application, the
application creates a file that it then sends to the printer. You can
also specify further printing instructions if you want to execute more
sophisticated printing tasks. While your job is being printed, you can
continue to work in your current application or go on to other tasks.
4.4.1 Printing Files from Applications

To print something currently being displayed on your screen---for example, a mail message---choose Print from the application's menu options. The file is sent to a print queue, which holds jobs waiting to be printed. Your print job is sent to the next available printer that can accept print jobs from that application.
DECwindows also lets you provide additional information about how you want your job printed. For example, you can specify the print queue to which you want your job sent and how many copies you want printed.
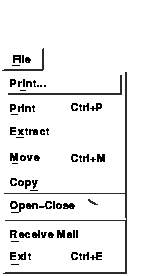
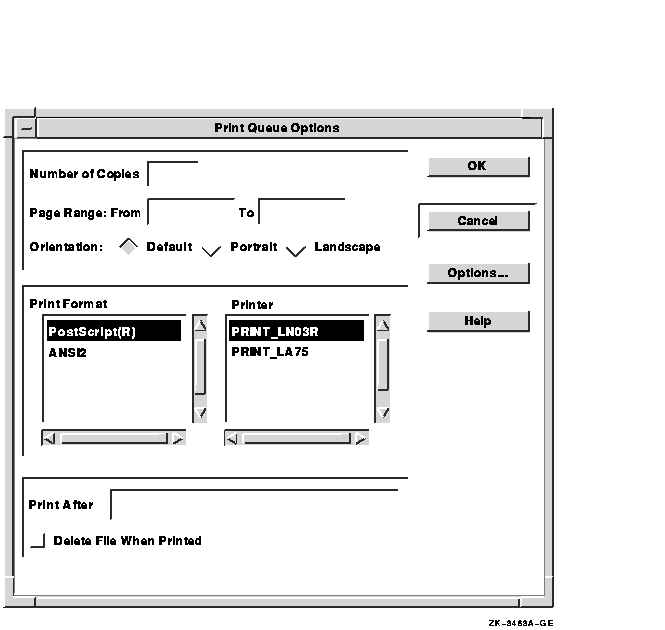
To provide this additional printing information, choose Print... from the application's File menu. The application displays a dialog box.

From the Print dialog box, you can change any of the following settings:
Number of Copies
By default, one copy of a job is printed. To print more copies, type the number of copies you want.Page Range
When you print a file, the entire file is printed. However, if you want to see page 2 of a five-page mail message, you can save paper by printing only that page. To change the page number at which the file starts printing, type a number in the From entry box. Do the same in the To entry box. For example, to print only page 2 of a five-page mail message, type a 2 in both entry boxes.Print Format
The Print Format list box contains the file formats produced by the current application for printing. These formatted files can be printed only on printers that recognize the specific format.If your system manager assigned the appropriate print queues to each print format, the Printer list box displays only those printers that can support the chosen print format. If you choose another print format, the Printer list box changes its display accordingly.
For example, card files you create with Cardfiler are formatted as text files. Every print queue that can accept text files---from line printers to sophisticated laser printers---is listed in the Printer list box. Paint, however, produces files formatted for PostScript and ANSI2 output. If the chosen print format is PostScript, the Printer list box displays LN03R and LPS40 print queues. If the chosen print format is ANSI2, only LN03, LN03R, and LPS40 print queues are displayed.
Note that FileView and Mail display all print formats that are supported by DECwindows, no matter what the file type of the file you selected for printing. Neither FileView nor Mail converts files from one format to the print format you choose. For example, if you select a TXT file in FileView, choose the Print command from FileView's Files menu, click on the Show Queue Options button in the Print dialog box, and click on OK, the Print Format list box displays all print formats, not just the text format.
The first print format in the list is the default option.
Printer
If your system manager assigned the appropriate print queues to each print format, the Printer list box lists the print queues that can accept the chosen print format.If the queue defined on your system as SYS$PRINT can accept print jobs in the chosen print format, that queue is listed first. The first print queue in the list is the default option; your print job is sent to the chosen queue. To change the print queue to which your print job is sent, select another print queue. Use the scroll bars to view the list of available print queues.
Orientation
All printers except line printers can print pages in two different page orientations---portrait and landscape. In portrait orientation, characters print parallel to the short edge of the paper. For example, this page is printed in portrait orientation. In landscape orientation, characters print parallel to the long edge of the paper. Note that the definition of portrait and landscape can be altered if you choose advanced print settings.Your system manager has assigned each printer a default orientation. The printer uses this default orientation when it prints your job. To change the orientation for your print job, point to the portrait or landscape option and click MB1.
Print After
Once you choose your print settings, your job is immediately submitted to the chosen print queue. You can change the time at which your job is actually printed by changing the information in the Print After entry box. By requesting that a print job be held until a specific time, you can ensure that a large print job is printed after hours, when fewer users are sharing printers.To change the time at which your job is printed, double click on the Print After entry box and type the time using the following format:
19-APR-1991 14:32
This print job will be held for printing until 2:32 p.m. on April 19, 1991.
Delete File When Printed
When you tell DECwindows to print a text or graphics file, it sends a copy of that file to the printer. These print files are not deleted once they are printed. This setting is indicated by an unshaded button. If you want to delete the print file after it is printed, click on the Delete File When Printed button.This button might not be displayed in all applications.
| Previous | Next | Contents | Index |