DECdocument Graphics Editor User's Guide for Motif
DECdocument
Graphics Editor User's Guide
for
Motif
This guide contains step-by-step instructions that show you how to use
the Graphics Editor to create, annotate and modify graphics. It also
includes information on how to format a graphic for printing, preview a
graphic outside the Graphics Editor, and extract text for modification
(usually for translation).
Revision/Update Information:
No Updates for Version 3.2
Software Version:
Graphics Editor Version 3.2
May 1997
The information in this document is subject to change without notice
and should not be construed as a commitment by Touch Technologies, Inc.
Touch Technologies, Inc. assumes no responsibility for any errors that
may appear in this document.
The software described in this document is furnished under a license
and may be used or copied only in accordance with the terms of such
license.
No responsibility is assumed for the use or reliability of software on
equipment that is not supplied by Digital Equipment Corporation or its
affiliated companies.
Restricted Rights: Use, duplication, or disclosure by the U.S.
Government is subject to restrictions as set forth in subparagraph (c)
(1) (ii) of the Rights in Technical Data and Computer Software clause
at DFARS 252.227-7013.
Copyright ©1995, 1997 Touch Technologies, Inc.
All Rights Reserved
The following are trademarks of Touch Technologies, Inc., and may be
used only to describe products of Touch Technologies, Inc.:
|
DYNAMIC TAPE ACCELERATOR
|
INTOUCH 4GL
|
|
INTOUCH INSA
|
DYNAMIC LOAD BALANCER PLUS
|
|
REMOTE DEVICE FACILITY
|
|
The following are trademarks of Digital Equipment Corporation:
Bookreader, DDIF, DEC, DECwindows, Digital, LN03, VAX, VMS, OpenVMS,
and the DIGITAL logo.
The following are third-party trademarks:
PostScript is a registered trademark of Adobe Systems, Inc.,
Motif is a registered trademark of Open Software Foundation, Inc.,
Helvetica and Times are registered trademarks of Linotype AG.
Preface
Purpose of this Guide
This guide is a task-oriented document. It explains the most common
Graphics Editor tasks, and leads you step by step in the creation and
modification of a graphic.
Who Should Use this Guide
This guide is for new users who want to learn how to use the
Graphics Editor and for experienced users who need reference information.
The guide is intended for users who are using the DECwindows Motif user
interface. You do not need to be familiar with graphics concepts and
terminology; this guide teaches you the necessary fundamentals.
Experienced users can also refer to the online help for reference
information.
Structure of this Guide
This guide is organized as follows:
Chapter 1 describes the basic information you need to get started
with the Graphics Editor.
Chapter 2 explains how to create a graphic.
Chapter 3 explains how to edit a graphic.
Chapter 4 describes what images are, how to display them, how to use
the Screen Capture option to capture screen images, and how to crop
images.
Appendix A explains how to use the Graphics Editor command line
utilities.
Appendix B summarizes all the Graphics Editor options and menu items.
Appendix C explains how to create characters using the symbol font
and composite characters.
For More Information
For more information about the Graphics Editor, see the Graphics Editor
Online Help. Chapter 1 explains how to access online help.
For information on how to use a DECwindows workstation, see the VMS
DECwindows User's Guide.
Conventions
This guide uses the following conventions:
| Convention |
Meaning |
|
MB1,MB2,MB3
|
MB1 indicates the left mouse button, MB2 indicates the middle mouse
button, and MB3 indicates the right mouse button. (The buttons can be
redefined by the user.)
|
|
Alt
|
The Alt key is labeled as the Compose Character key on some keyboards.
|
|
Ctrl/x
|
A sequence such as Ctrl/x indicates that you must hold down the key
labeled Ctrl while you press another key or a pointing device button.
Used to indicate a keyboard equivalent.
|
|
Compose x x
|
A sequence such as Compose x x indicates that you must press the
Compose Character key followed by the other two keys. This sequence is
used to indicate a keyboard equivalent.
|
|
click
|
The term click, when used with a mouse button, means you press and
release the button.
|
|
[Return]
|
A key name enclosed in a box indicates that you press a key on a
keyboard.
|
Chapter 1
Overview
The DECdocument Graphics Editor is an application that lets you create
and edit illustrations. The Graphics Editor is object-oriented, which
means that you create a graphic from objects, such as lines and
circles, rather than editing pixels as you would using a paint program.
With the Graphics Editor, you can do the following tasks:
- Create object shapes (circles, rectangles, arcs, lines, pie
segments, and polygons) and images
- Add text in various type fonts and sizes
- Import text from an external ASCII file
- Edit objects, and move, copy, scale, and rotate them
- Add color and fill patterns to the objects
- Open multiple drawing windows and move or copy elements from one
drawing to another
- Create output files, such as Bookreader, sixel, DDIF, Xbitmap, and
Encapsulated PostScript files
- Access the Artwork Gallery, a collection of graphics created by
Digital using the Graphics Editor
1.1 Unique Characteristics
The following list describes some of the characteristics unique to the
DECdocument Graphics Editor:
- When creating and editing graphics, Graphics Editor uses all three
mouse buttons to speed up the process.
- When you use a mouse button, you click the button (press and
release), rather than hold it down while you do an operation such as
draw a line. You click the button again when you finish an operation.
- When you are working on an illustration, you do not have to change
modes to draw, edit, or enter text.
- When you create an illustration, you have the option of using the
default parameters (line weight, color, and so on), or you may change
the default parameters to your own user-defined parameters. In this
way, you can produce a final drawing without first producing a rough or
draft.
1.2 Learning by Doing
The best way to learn about the Graphics Editor is to use it. The
exercises in Chapters 2 through 4 give you hands-on experience with the
Graphics Editor by leading you through the creation and modification of a
graphic. The exercises explain the most common options.
It will take you approximately three hours to complete all the
exercises.
You must have a workstation running VMS DECwindows and know how to use
DECwindows to do the exercises. If you need information on using
DECwindows, see the VMS DECwindows User's Guide.
1.3 Invoking the Graphics Editor
To invoke the Graphics Editor:
- Set your default directory to the directory where you want to
store your graphics files. For example:
$ SET DEFAULT DISK:[USER.directory-name]
|
- If you are trying to invoke the Graphics Editor from a process on a
system other than your workstation, enter the following command:
$ SET DISPLAY/CREATE/NODE=your-workstation-node
|
This command specifies that all DECwindows applications be
displayed on your workstation screen.¹
- Enter the following command to invoke the Graphics Editor:
$ DOCUMENT/GRAPHICS [filename]
|
The file name is optional. If you specify a file name, you can specify
an existing graphics file or a new file. The file extension (.gra) is
optional.
If you do not specify a file name, the Graphics Editor assigns the name
geMeta.gra to your graphic. You can change the file name
later using the Save As ... menu item on the File menu.
Note
¹ You must grant access to remote processes
for them to be displayed on your workstation screen. To do this, enter
the remote node and user name of the remote process in the
Customize...Security menu on your workstation. The following message
appears if you fail to enter this information: Client not authorized to
access server.
|
1.4 Closing a Graphics Editor File
To close a file:
- Choose Close from the File menu. Figure 1-1 shows the Close
dialog box.
Figure 1-1 Close Dialog Box
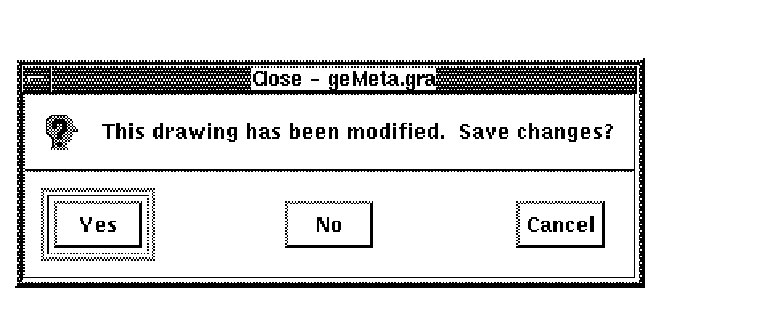
- Choose one of the following options:
- Yes to save the changes you made to the file. Your graphic is saved
under the file name listed in the drawing window title bar.
- No to close the file without saving any changes to the file.
- Cancel to cancel the Close operation without closing the file.
Choose New Window from the Control menu on the Control Panel window to
open a new drawing window.
1.5 Exiting the Graphics Editor
To exit from the Graphics Editor at any time:
- Choose Exit from the Control menu. Figure 1-2 shows the dialog
box.
Figure 1-2 Close Dialog Box
- Choose one of the following options:
- Yes to save the changes you made to the drawing or drawings and
exit. Each drawing window moves to the front, and you are asked if you
want to save it. Your graphics are saved under the file name listed in
the drawing window title bar.
- No to exit without saving any changes to any drawings.
- Cancel to cancel the Exit operation without exiting.
1.6 Reinvoking the Graphics Editor
To reinvoke the Graphics Editor, enter the following command:
$ DOCUMENT/GRAPHICS filename
|
The file name is the name of the file you were editing. The
Graphics Editor is restarted, and the file you were editing is displayed
in the drawing window.
1.7 Checkpoint Files
During each Graphics Editor session, the Graphics Editor automatically
creates a checkpoint file (RCKP_filename) of the graphic you are
editing. The checkpoint is updated by default every 15 modifications
you make to the graphic. You can change the checkpointing frequency or
turn off checkpointing by choosing Checkpointing from the Settings ...
submenu of the Options menu on the Control Panel window.
1.8 Graphics Editor Windows and Menus
After you invoke the Graphics Editor, the following three windows are
displayed:
- Drawing
- Control Panel
- Hints
You can resize each window separately and move it to other locations on
the screen.
1.9 Drawing Window
The Drawing window includes a menu bar and a drawing area that you use
to create and display graphics. The title bar of the Drawing window
displays the file name for the graphic you are editing. Figure 1-3
shows the menus on the Drawing window menu bar. Table 1-1 summarizes
the functions of these menus.
Figure 1-3 Drawing Window Menus
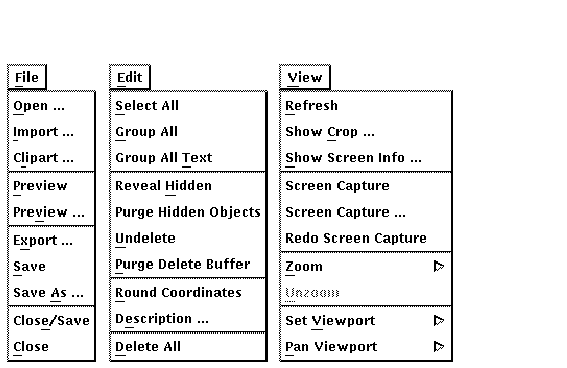
Table 1-1 Drawing Window Pull-Down Menus
| Menu |
Use To |
|
File
|
Display (import) a file or image, format a graphics file for printing
and Bookreader display, save a file or image, and exit the Graphics Editor.
|
|
Edit
|
Perform a specified action on all objects in the window.
|
|
View
|
Refresh the screen, view the crop region on a graphic, digitize
(capture) images on the screen, zoom in on a part of a graphic, and
reposition a graphic within the Drawing window.
|
|
Help
|
Display overview help and glossary definitions.
|
Chapters 2 through 4 explain many of the menu items on the drawing
window. For an explanation of menu items not covered in those chapters,
see Appendix B or the Graphics Editor help. For information on help, see
Section 1.11.
1.10 Control Panel Window
Use the Control Panel window to create and edit objects. Figure 1-4
shows the sections of the Control Panel. Table 1-2 describes each
section.
Figure 1-4 Control Panel Sections
Table 1-2 Control Panel Sections
| Control Panel Section |
Function |
|
Status area
|
Shows the current font and unit base.
|
|
Object icons and creation options
|
Used to create objects and control their creation.
|
|
Editing operations
|
Used to edit objects after you create them.
|
|
Constraints
|
Used with the creation or editing options to modify the operation, such
as to restrict it to a horizontal movement.
|
|
Settings
|
Used with the editing options to control editing.
|
The Control Panel window contains three pull-down menus: Control,
Attributes, and Options. Figure 1-5 shows the menus on the control
panel menu bar. Table 1-3 describes each of the menus.
Figure 1-5 Control Panel Menus
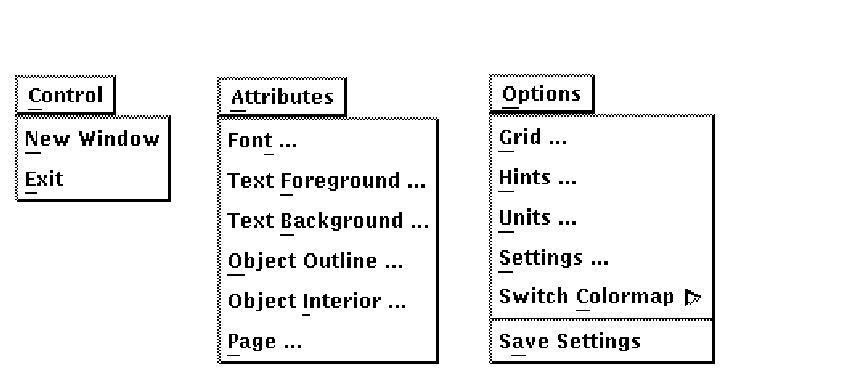
Table 1-3 Control Panel Pull-Down Menus
| Menu |
Use To: |
|
Control
|
Open a new or alternate drawing window and to exit the Graphics Editor.
|
|
Attributes
|
Specify text, object, and page attributes.
|
|
Options
|
Display a grid, display the Hints window, specify a new color map,
change settings and units, and save settings and units.
|
For most of the Control Panel window, you can also use keyboard
equivalents to change the options, constraints, and settings. Note the
underlined letters on each of the menus and the menu options on your
screen. These are the letters you use to choose the menus and the menu
options you want if you are using keyboard equivalents. The Drawing
window must have focus for any keystrokes from the keyboard to work.
To use keyboard equivalents:
- Depending on your keyboard type, do one of the following:
- LK201 keyboard, press Compose Character and the space bar
simultaneously.
- LK401 keyboard, press the Alt function key.
- Press the letter of the menu.
- Press the letter of the option.
When you use keyboard equivalents, the Control Panel changes to reflect
the new selection whether the panel is visible or not. For example, if
you enlarge the Drawing window and it hides the Control Panel, you can
use keyboard equivalents to change options on the Control Panel without
moving to the Control Panel.
1.11 Hints and Other Help
There are four kinds of help available on the Graphics Editor:
- Hints
- Context-sensitive help
- Conceptual help
- Command-line help for VMS
The technique for displaying each type of help is described in the
following sections.
1.11.1 Hints Window
The Hints window indicates what actions you can perform based on the
creation icon and editing option that is active. The Hints window is
available on the Options menu of the Control Panel window.
The Graphics Editor automatically updates the hints each time you perform
an action. If the hints do not fit completely within the default Hints
window, use the Resize button to widen the window.
1.11.2 Context-Sensitive Help
Context-sensitive help is available on menus, menu items, Control Panel
selections, pop-up menus, and most dialog boxes.
To display context-sensitive help:
- Point to an item.
- Press and hold the Help key.
- Click MB1. The Help window appears.
- Release the Help key.
1.11.3 Conceptual Help
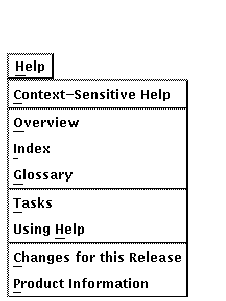
Conceptual Help displays information and help in the following areas:
- Context-Sensitive Help---Explains context-sensitive help
- Overview---describes Graphics Editor application software
- Index---Lists the topics discussed in help
- Tasks---Explains common tasks and functions
- Glossary---Defines the most commonly used expressions and operators
- Using Help---Help on help
- Changes for this Release---Describes new features and enhancements
for this release
- Product Information--Briefly describes Graphics Editor product
information such as where to send comments, how to get documentation,
and trademark information about the Graphics Editor, and a glossary of
graphic terms
Figure 1-6 shows the Help menu.
Figure 1-6 Conceptual Help Menu
1.11.4 Command-Line Help for VMS Systems
Command-line help is available for the following Graphics Editor commands:
- DOCUMENT/GRAPHICS[=EDIT]
- DOCUMENT/GRAPHICS=RENDER
- DOCUMENT/GRAPHICS=TEXT_FILTER
- DOCUMENT/GRAPHICS=VIEW
These commands are described in Appendix A. Chapter 3 features
exercises that use these utilities.
To access the command-line help:
- Enter:
- Choose the DOCUMENT/GRAPHICS command for which you need help.