The NTP configuration file UCX$NTP.CONF contains a list of hosts your system will use for time synchronization. Before configuring your host, you must:
To ensure reliable synchronization, you should select multiple time sources that you are certain provide accurate time and are synchronized to an Internet time server.
To minimize common points of failure, avoid synchronizing:
To simplify configuration file maintenance, avoid configuring peer
associations with higher stratum servers.
8.2.1 Creating the Configuration File
If you used the configuration procedure to configure NTP, the file SYS$SPECIFIC:[UCX$NTP]UCX$NTP.TEMPLATE was created. Edit a copy of this template to add the names of participating hosts, then save the file as SYS$SPECIFIC:[UCX$NTP]UCX$NTP.CONF. NTP periodically reads the last version of this file so your changes to it are dynamic.
The following shows a sample NTP.CONF file. Comment lines begin with a semicolon ( ; ).
; Sample NTP Configuration, 14-January-1997

peer 18.72.0.3
peer 130.43.2.2
peer 16.1.0.22

local-master 20
Valid configuration file entries are as follows:
The option version n specifies the version of NTP the host is using. Version is specified in the outgoing packets used to negotiate synchronization. Version 1, 2, and 3 are valid choices; 3 is the most current implementation and is considered to be the default if you do not explicitly indicate a version number.
If you need to synchronize to a host running an earlier version of NTP, enter the version number to the server declaration in your configuration file. For example,
server 130.42.95.1 version 2
The keyword internet_address can be either a DNS name or an IP
address.
8.2.2 Configuration Example
Figure 8-1 illustrates a network configuration with multiple backup levels. Sample configuration files follow.
Figure 8-1 Sample NTP Environment
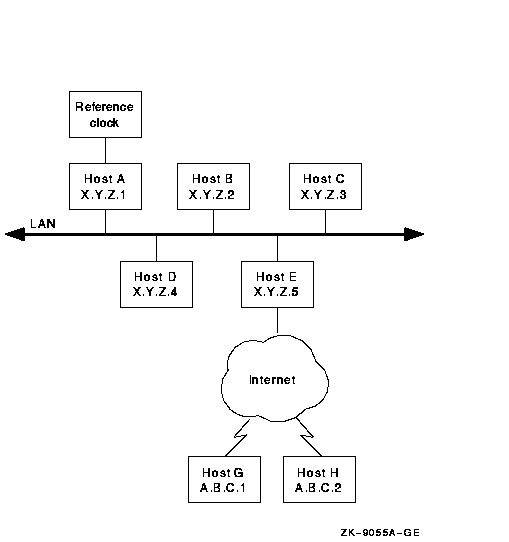
In this example, local hosts synchronize to time servers as follows:
The configuration files for such a scheme would look as follows:
;Host A
master-clock 1 ;WWVB radio clock
;Host B
local-clock 10
server X.Y.Z.1 ;HOST A
server A.B.C.1 ;HOST G
server A.B.C.2 ;HOST H
server X.Y.Z.1 ;HOST A
peer   X.Y.Z.2 ;HOST B
server A.B.C.1 ;HOST G
server A.B.C.2 ;HOST H
NTP is started automatically if you selected NTP while running the configuration procedure after installation.
To stop NTP, enter the following command:
$ @SYS$MANAGER:UCX$NTPD_SHUTDOWN.COM
To restart NTP, enter the following command:
$ @SYS$MANAGER:UCX$NTPD_STARTUP.COM
OpenVMS Version 5 and Version 6 use different logical names to define time-zone offsets. NTP searches for the presence of these names as follows:
If the time-zone offset logical name is invalid, NTP does not capture
time differences of more than 20 minutes. Follow the steps listed in
Section 8.4.1 or Section 8.4.2.
8.4.1 Defining Time-Zone Offsets (OpenVMS Version 5 or Earlier)
The logical name UCX$NTP_TZ stores the UTC offset in hours, minutes, and seconds, in the format sHHMMSS, where s is "+" or "-", and HHMMSS is the offset in hours, minutes, and seconds. For example, in a location with daylight saving time (EST5EDT4), the UCX$NTP_TZ definition is -040000.
For time-zone offset information, define the logical name UCX$NTP_TZ before you start NTP. Edit the following line in SYS$COMMON:[SYSMGR]UCX$NTPD_STARTUP.COM:
$ DEFINE /SYSTEM UCX$NTP_TZ -040000
Change the value to your time-zone offset and delete the semicolon.
If the NTP service is enabled, stop NTP by executing the command file as follows:
$ @SYS$MANAGER:UCX$NTPD_SHUTDOWN.COM
To restart NTP, execute the command file as follows:
$ @SYS$MANAGER:UCX$NTPD_START.COM
In OpenVMS Version 6 and higher, the operating system's installation procedure provides a command procedure that defines a time-zone differential (offset) logical name in the system logical name table (LNM$SYSTEM_TABLE).
The procedure is SYS$COMMON:[SYSMGR]UTC$CONFIGURE_TDF.COM.
The logical name is SYS$TIMEZONE_DIFFERENTIAL.
To define a time-zone offset, follow these steps:
$ @SYS$MANAGER:UCX$NTPD_SHUTDOWN.COM
$ @SYS$MANAGER:UCX$NTPD_START.COM
NTP maintains a record of any system clock updates in the file SYS$SPECIFIC:[UCX$NTP]UCX$NTP_LOGFILE.LOG. NTP reopens this log file daily, each time creating a new version of the file (older versions are not automatically purged). Events logged to this file may include self-explanatory messages such as
NTP also logs adjustments it makes to the system time. For example:
Table 8-1 describes the messages you may typically encounter in an NTP log file.
| Message | Description |
|---|---|
| new tick |
A sequence of new ticks is typically used to change the tick length to
speed up or slow down the local clock. For example:
17:40:10.63 +0.188438 seconds, new tick 100042 for 511 seconds
The first value indicates the time the entry was made. The second value, +0.188438, is the offset of the source clock in relation to the local clock, a positive offset indicating that the source clock is behind the local clock (that is, the local clock is drifting ahead). Finally, the entry announces that NTP has selected a new tick count for 511 seconds in an effort to reduce the difference between the local and source clocks, by slowly drifting together. Had the offset value been negative, indicating that the local clock was falling behind the source clock, NTP would have introduced a lower tick count. |
| filtered |
After receiving an update from the source, NTP applies a filtering
process to remove data likely to reduce the accuracy of NTP. If the
offset between the local and source clocks is larger than a selected
aperture, then the update is discarded and a message displayed. For
example:
17:18:50.58 -0.821443 seconds, filtered, aperture 0.679110
|
| discarded |
If the round-trip time of the NTP message exchange exceeds a certain
value (defined on an association-by-association basis), then the update
is discarded and the following message logged:
17:20:26.59 +0.029689 seconds, discarded, trip > 0.075932
|
| offset | This is the value between local time and NTP universal time in seconds. |
| lost synchronization |
Announces that synchronization has been lost. For example:
* lost synchronization, no valid sample from peer
This can occur under the following circumstances:
|
| selected new synch source |
Announces that an update passed validity tests; the new host is
accepted as the synchronization source. For example:
* selected new synch source 16.199.99.2, now at stratum 5
|
| hold value | After identifying a potential new source, NTP uses a hold procedure to ensure the newly selected source is stable and generating messages on a regular basis. This hold value starts with 5 and decreases by 1 every time a packet is received. A source is not considered for synchronization until the hold value equals zero (0). |
| accumulated drift |
Indicates that NTP added or subtracted a single tick to the local
clock. For example:
* accumulated drift -6.6025 PPM, frobbed systick -1
|
| clock reset |
Indicates that NTP set the local clock by jumping the local time to
match the synchronization source. This occurs when the difference
between the local clock and the synchronization source is too great to
resolve with a drift sequence. For example:
* clock reset ~+582.429 sec by something, clearing
|
8.5.0.1 Sample NTP Log File
The following shows a sample NTP log file.
* lost contact with peer 16.1.0.2
* synch source lost, free running
* re-acquired peer 77.88.208.8
* selected new synch source 77.88.208.8, now at Stratum 5
 17:09:56.09    +0.004304 seconds, trip 0.1039, aperture 0.0143, hold 4
 17:10:06.09    +0.003959 seconds, trip 0.1039, aperture 0.0140, hold 3
 17:10:38.09    +0.004832 seconds, trip 0.1000, aperture 0.0148, hold 2
 17:11:10.09    +0.004043 seconds, trip 0.1000, aperture 0.0140, hold 1
 17:11:42.09    +0.002963 seconds, trip 0.1000, aperture 0.0130, hold 0
 17:12:14.17    +0.003922 seconds, new tick 100004 for 31 seconds
 17:12:46.18    +0.002536 seconds, new tick 100004 for 36 seconds
 17:13:50.25    +0.006192 seconds, new tick 100004 for 89 seconds
 17:15:58.18    +0.000944 seconds, new tick 100004 for 13 seconds
 17:20:14.28    +0.000444 seconds, new tick 100004 for 6 seconds
 17:24:30.38    +0.003322 seconds, new tick 100004 for 47 seconds
 17:33:02.29    +0.001390 seconds, new tick 100004 for 20 seconds
 17:50:06.40    +0.001011 seconds, new tick 100004 for 14 seconds
 18:24:14.41    -0.001323 seconds, new tick 100002 for 19 seconds
 18:58:22.42    -0.000461 seconds, new tick 100002 for 6 seconds
* re-acquired peer 16.1.0.2
* selected new synch source 16.1.0.2, now at Stratum 3
 19:26:00.37    -0.005816 seconds, trip 0.2600, aperture 0.0158, hold 4
 19:26:10.49    -0.006081 seconds, trip 0.2200, aperture 0.0161, hold 3
 19:26:42.50    -0.012000 seconds, trip 0.2300, aperture 0.0120, hold 2
 19:27:14.54    +0.017324 seconds, trip 0.2700, aperture 0.0120, hold 1
 19:27:46.51    +0.001404 seconds, trip 0.2200, aperture 0.0114, hold 0
 19:33:38.66    -0.002879 seconds, new tick 100002 for 31 seconds
 19:38:10.76    -0.004792 seconds, new tick 100001 for 31 seconds
 19:45:06.97    +0.055078 seconds, discarded, trip > 0.132004
 19:48:02.92    -0.004358 seconds, new tick 100001 for 31 seconds
Simple Network Management Protocol (SNMP) is network management technology that facilitates the management of a TCP/IP network or internet in a vendor-independent manner. SNMP enables a network administrator to manage the various network components using a set of well-known procedures understood by all components, regardless of the vendor that manufactured them.
Configuring the SNMP agent on your system allows a remote SNMP management client to obtain information about your host and to set network parameters.
This chapter reviews key concepts and describes how to configure SNMP
on your UCX host.
9.1 Reviewing Key Concepts
Systems using SNMP are divided into two categories: management consoles (sometimes called clients or stations) and agents (sometimes called servers). The management console is the system that issues a query; the agent runs on the system being queried. Queries are sent and received in the form of protocol data units (PDUs).
Depending on how you configure your host, an SNMP client can obtain information about your host or actually perform updates on your host's MIB data items. For example, you can configure your host to:
DIGITAL TCP/IP Services for OpenVMS provides an SNMP master agent, two subagents (the Management Information Base (MIB) II and host resource MIB), a MIB compiler, and a MIB browser. The subagents (MIBs) are simply a set of routines that implement a hierarchical tree of managed objects. Table 9-1 describes these components.
| Component | Description |
|---|---|
| Master agent SNMP Version 1 | The module that maintains the database for managed objects and allows objects to register themselves. Sends information about these objects to remote SNMP management consoles. |
| MIB II | Provides information about the protocol stack and other network activity. |
| Host resource MIB | Provides information about the system, system software, and performance. |
| MIB compiler | Compiles MIB files into source code templates for use in building subagents. |
| MIB browser | Acts as a simple client that issues SNMP commands to get a set of values for a MIB. |
The first time an SNMP management "client" sends a request, the following occurs on the UCX host:
After SNMP starts, the master agent continues to receive subsequent
incoming requests at the specified port 161. (Local communication
between the master agent and subagents occurs using port 242.)
9.2 Configuring SNMP
SNMP runs as a UCX service. You can configure SNMP with UCX$CONFIG or with the SET CONFIGURATION SNMP command.
Important
You enable client SET commands only with the /FLAG=SETS option to the SET CONFIGURATION SNMP command. You cannot enable SETS if using UCX$CONFIG to configure SNMP.
When you configure SNMP, you must supply the name of a contact person and the following information about your host:
UCX> SET CONFIGURATION SNMP /COMMUNITY="PUBLIC" /ADDRESS=0.0.0.0
Traps are sent to port 162 on hosts for all trap addresses regardless
of community name. The use of address 0.0.0.0 on a trap means no trap
is sent.
9.3 Displaying the Current SNMP Configuration
To display stored information about the agent, issue SHOW CONFIGURATION SNMP. Use the /FULL qualifier if you want to display the addresses that the agent recognizes as members of the community. For example:
UCX> SHOW CONFIGURATION SNMP /FULL

SNMP Configuration

Flags:    Sets

Contact:  Sam Spade

Location
  First:  Falcon Building
  Second: Los Angeles, CA

Community           Type       Address_list

public              Read       0.0.0.0

writeit             Read Write 0.0.0.0, 9.20.208.53

trapit              Trap       9.20.208.53, 9.20.208.100
UCX provides a MIB browser that lets you handle single SNMP commands for READ/WRITE to a MIB.
To run the MIB browser:
$ SNMP_request == "$SYS$SYSTEM:UCX$SNMP_request"
$ SNMP_request agent_addr "community" request [variable_name|type_value]
Here,
| agent_addr | Is either a fully qualified domain name or simply a host name if the host is in the same domain as the host on which the browser is running. |
| community | Is case-sensitive. For clear specification, enclose the name in double quotes (" "). Note, if you do not use quotes, the name will be changed to lowercase. |
| request |
Is one of the following:
|
The following UNIX-like switches are available for SET requests:
| --i | Integer |
| --o | Octet |
| --d | Object identifier |
| --a | IP_address |
| --c | Counter |
| --g | Gauge |
| --t | Time_ticks |
| --u | Unsigned integer 32 |
| --D | Display string |
| --N | NULL |
These switches are case-sensitive. To preserve uppercase for display
string and NULL, enclose each switch in double quotes. For example,
"--D" or "--N".
9.4.1 More on Case Sensitivity
Community names are case sensitive. To preserve the case when entering a community name, enclose the name in double quotes (" "). This is true of the SET CONFIGURATION SNMP command and for any MIB browser (client) running under DCL.
If you do not enclose the community name (or other parameter) in double quotes (" "), the parameter is translated to all uppercase or all lowercase depending on the context.
Important
If you use UCX$CONFIG to configure SNMP, do not use double quotes (" ") to preserve the case. Case will be preserved exactly as you enter it.
Table 9-2 lists the names of the SNMP executable and command files and their locations.
| File | Location | Function |
|---|---|---|
| UCX$ESNMP_SERVER.EXE | SYS$SYSTEM | Master agent image |
| UCX$OS_MIB.EXE | SYS$SYSTEM | MIB-II subagent image |
| UCX$HR_MIBS.EXE | SYS$SYSTEM | Host resources MIB subagent image |
|
UCX$MIBCOMP.EXE
UCX$MOSY.EXE UCX$SNMPI.EXE |
SYS$SYSTEM | Images associated with the MIB compiler |
| UCX$SNMP_REQUEST.EXE | SYS$SYSTEM | Simple MIB browser used to obtain GET/GETNEXT/SET MIB values |
| UCX$ESNMP_SHR.EXE | SYS$SHARE | Sharable image version of the routines in UCX$SNMP:*.OLB |
| UCX$SNMP_STARTUP.COM¹ | SYS$SYSDEVICE:[UCX$SNMP] | Starts the master and subagents |
| UCX$SNMP_SHUTDOWN.COM¹ | SYS$SYSDEVICE:[UCX$SNMP] | Stops the master agent and subagents |