![[OpenVMS documentation]](../../images/openvms_doc_banner_top.gif)
|
![[Site home]](../../images/buttons/bn_site_home_off.gif)
![[Send comments]](../../images/buttons/bn_comments_off.gif)
![[Help with this site]](../../images/buttons/bn_site_help_off.gif)
![[How to order documentation]](../../images/buttons/bn_order_docs_off.gif)
![[OpenVMS site]](../../images/buttons/bn_openvms_off.gif)
![[Compaq site]](../../images/buttons/bn_compaq_off.gif)
|
| Updated: 11 December 1998 |
OpenVMS Debugger Manual
| Previous | Contents | Index |
If you select the name of a pointer (access) variable and click on the
MON button, the debugger displays the address of the referenced object
in the
Value/Deposit column of the monitor view (see the top entry in
Figure 10-15).
To monitor the value of the referenced object (to dereference the pointer variable), double click on the pointer name in the Monitor Expression column. This adds an entry for the referenced object in the monitor view, indented under the pointer entry (see the bottom entry in Figure 10-15). If a referenced object is an aggregate, you can double click on its name to display its elements, and so on.
Figure 10-15 Pointer Variable and Referenced Object in Monitor View

Whenever the program changes the value of a watched variable, the debugger suspends execution and displays the old and new values in the command view.
To watch a variable (also known as setting a watchpoint on a variable):
Figure 10-16 Watched Variable in Monitor View

To deactivate a watchpoint, clear its Watched button in the monitor view (by clicking on the button) or choose Toggle Watchpoint in the Monitor menu. To activate a watchpoint, fill in its Watched button or choose Toggle Watchpoint in the Monitor menu.
Section 10.6.1 explains static and nonstatic (automatic) variables and how to access them. The debugger deactivates a nonstatic watchpoint when execution moves out of (returns from) the variable's defining routine. When a nonstatic variable is no longer active, its entry is dimmed in the monitor view and its Watched button is cleared.
The debugger does not automatically reactivate nonstatic watchpoints if
execution later returns to the variable's defining routine. You must
reactivate nonstatic watchpoints explicitly.
10.5.6 Changing the Value of a Monitored Scalar Variable
To change the value of a scalar (nonaggregate) variable, such as an integer or Boolean type (see Figure 10-17):
Figure 10-17 Changing the Value of a Monitored Scalar Variable
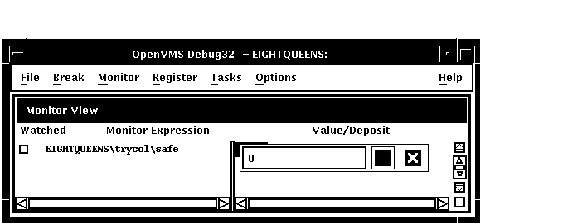
To cancel a text entry and dismiss the dialog box, click on X (Cancel).
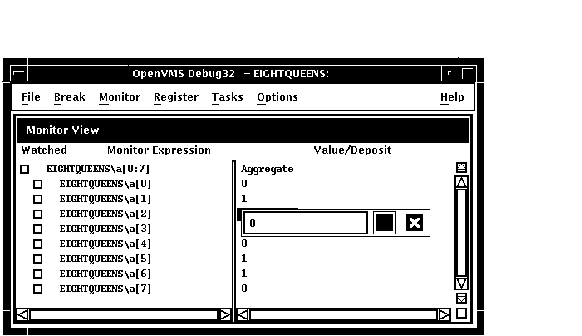
You can change the value of only one component of an aggregate variable (such as an array or structure) at a time. To change the value of an aggregate-variable component (see Figure 10-18):
Figure 10-18 Changing the Value of a Component of an Aggregate Variable
This section provides some general information about accessing program variables while debugging.
If your program was optimized during compilation, you might not have access to certain variables while debugging. When you compile a program for debugging, it is best to disable optimization, if possible (see Section 1.2.1).
Before you check on the value of a variable, always execute the program
beyond the point where the variable is declared and initialized. The
value contained in any uninitialized variable should be considered
invalid.
10.6.1 Accessing Static and Nonstatic (Automatic) Variables
The generic term nonstatic variable is used here to denote what is called an automatic variable in some languages. |
A static variable is associated with the same memory address throughout execution of the program. You can always access a static variable.
A nonstatic variable is allocated on the stack or in a register and has a value only when its defining routine or block is active (on the call stack). Therefore, you can access a nonstatic variable only when program execution is paused within the scope of its defining routine or block (which includes any routine called by the defining routine).
A common technique for accessing a nonstatic variable is first to set a breakpoint on the defining routine and then to execute the program to the breakpoint.
Whenever the execution of your program makes a nonstatic variable inaccessible, the debugger notifies you as follows:
While debugging a routine in your program, you can set the current scope to a calling routine (a routine down the stack from the routine in which execution is currently paused). This enables you to:
The Call Stack menu on the main window lists the names of the routines (and, under certain conditions, the images and modules) of your program that are currently active on the stack, up to the maximum number of lines that can be displayed on your screen (see Figure 10-19). The numbers on the left side of the menu indicate the level of each routine on the stack relative to level 0, which denotes the routine in which execution is paused.
To set the current scope to a particular routine on the stack, choose the routine's name from the Call Stack menu (see Figure 10-19). This causes the following to occur:
Figure 10-19 Current Scope Set to a Calling Routine
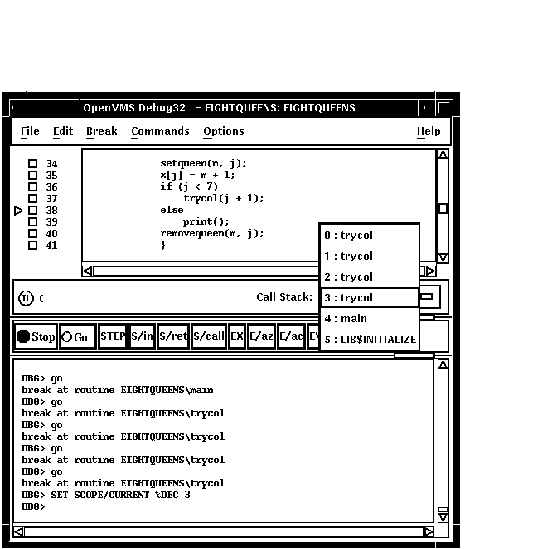
When you set the scope to a calling routine, the current-location
pointer (which is cleared) marks the source line to which execution
will return in that routine. Depending on the source language and
coding style used, this might be the line that contains the call
statement or some subsequent line.
10.6.3 How the Debugger Searches for Variables and Other Symbols
Symbol ambiguities can occur when a symbol (for example, a variable name X) is defined in more than one routine or other program unit.
In most cases, the debugger automatically resolves symbol ambiguities. First, it uses the scope and visibility rules of the currently set language. In addition, because the debugger permits you to specify symbols in arbitrary modules (to set breakpoints and so on), the debugger uses the ordering of routine calls on the call stack to resolve symbol ambiguities.
In some cases, however, the debugger might respond as follows when you specify a symbol that is defined multiple times:
To resolve such problems, you must specify a scope where the debugger should search for the particular declaration of the symbol:
DBG> EXAMINE SWAP\X |
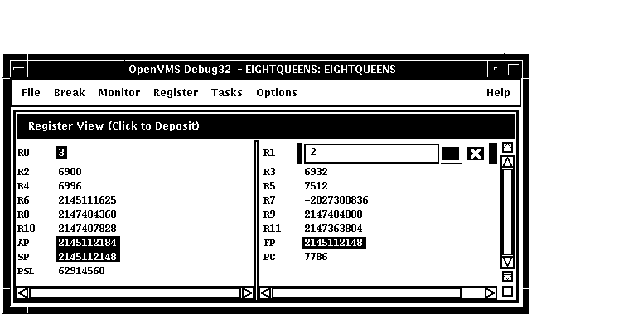
The register view displays the current contents of all machine registers (see Figure 10-20).
To display the register view, choose Views... from the Options menu on the main window or the optional views window, then click on Registers when the Views dialog box appears.
By default, the register view automatically displays the register values associated with the routine in which execution is currently paused. Any values that change as your program executes are highlighted whenever the debugger regains control from your program.
To display the register values associated with any routine on the call stack, choose its name from the Call Stack menu on the main window (see Section 10.6.2).
To change the value stored in a register:
To change the radix used to display register values:
Figure 10-20 Register View
The instruction view displays the decoded instruction stream of your program: the code that is actually executing (see Figure 10-21). This is useful if the program you are debugging has been optimized by the compiler so that the information in the main window does not exactly reflect the code that is executing (see Section 1.2).
Figure 10-21 Instruction View
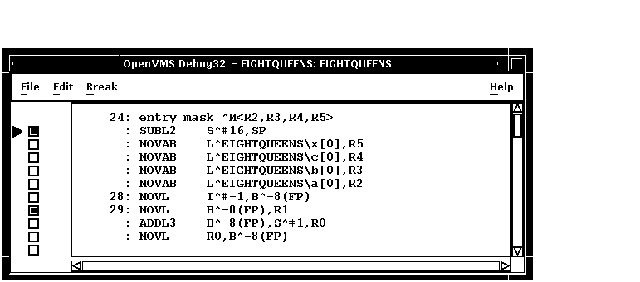
To display the instruction view, choose Views... from the Options menu on the main window or the optional views window, then click on Instructions when the Views dialog box appears.
By default, the instruction view automatically displays the decoded instruction stream of the routine in which execution is currently paused. The current-location pointer, to the left of the instructions, marks the instruction that will execute next.
By default, the debugger displays source code line numbers to the left of the instructions with which they are associated. To hide or display line numbers, toggle Display Line Numbers from the File menu in the instruction view.
By default, the debugger displays memory addresses to the left of the instructions. To hide or display addresses, toggle Show Instruction Addresses from the File menu in the instruction view.
After navigating the instruction view, click on the Call Stack menu to redisplay the location at which execution is paused.
To display the instruction stream of any routine on the call stack,
choose the routine's name from the Call Stack menu on the main window
(see Section 10.6.2).
10.9 Debugging Tasking Programs
Tasking programs have multiple threads of execution within a process and include the following:
Within the debugger, the term task denotes such a flow of control, regardless of the language or implementation. The debugger's tasking support applies to all such programs.
The debugger enables you to display task information and modify task characteristics to control task execution, priority, state transitions, and so on.
The following sections summarize the tasking features of the debugger's
DECwindows Motif interface. For more information about the debugger's
tasking support, see Chapter 17.
10.9.1 Displaying Information About Tasks
To display information about one or more tasks of your program, choose Views... from the Options menu on the main window or the optional views window, then click on Tasking when the Views dialog box appears.
The tasking view gives information about all currently existing (nonterminated) tasks of your program. The information is updated whenever the debugger regains control from the program, as shown in Figure 10-22.
Figure 10-22 Tasking View

The displayed information includes:
10.9.2 Changing Task Characteristics
To modify a task's characteristics or the tasking environment while
debugging, choose one of the following items from the Tasks menu:
| Tasks Menu Item | Description |
|---|---|
| Abort | Request that the selected task be terminated at the next allowed opportunity. The exact effect depends on the current event facility (language dependent). For Ada tasks, this is equivalent to executing an abort statement. |
| Activate | Make the selected task the active task. |
| Hold | Place the selected task on hold. |
| Nohold | Release the selected task from hold. |
| Make Visible | Make the selected task the visible task. |
| All | Use the submenu to abort all tasks or release all tasks from hold. |
The debugger is installed on your system with a default debugger resource file (DECW$SYSTEM_DEFAULTS:VMSDEBUG.DAT) that defines the startup defaults for the following customizable parameters:
A copy of the system default debugger resource file with explanatory comments is included in Example 10-1 in Section 10.10.4.
You can modify the first three of these display attributes interactively from the DECwindows Motif interface, as explained in Section 10.10.1, Section 10.10.2, and Section 10.10.3. In each case, you can save the modified display configuration for future debugging sessions by choosing Save Options from the Options menu.
In addition, you can modify all the listed attributes of the debugger display configuration by editing and saving the debugger resource file, as explained in Section 10.10.4.
When you choose Save Options from the Options menu or you edit and save the local debugger resource file, the debugger creates a new version of the local debugger resource file DECW$USER_DEFAULTS:VMSDEBUG.DAT that contains the definitions of the display configuration attributes. When you next start the debugger, it uses the attributes defined in the most recent local resource file to configure the output display. You can fall back to previous debugger display configurations with appropriate use of the DCL commands DELETE, RENAME, and COPY.
To fall back to the system default display configuration, select
Restore Default Options from the OpenVMS Debugger Options menu.
10.10.1 Defining the Startup Configuration of Debugger Views
To define the startup configuration of the debugger views:
When you next start the debugger, the debugger uses the most recent resource file to create the new display configuration.
You can also define the startup display configuration by editing the
definition of these views in the resource file (see Section 10.10.4).
10.10.2 Displaying or Hiding Line Numbers in Source View and Instruction View
The source view and instruction view display source line numbers by default at debugger startup. To hide (or display) line numbers at debugger startup:
When you next start the debugger, the debugger uses the most recent resource file to create the new display configuration.
You can also set the startup default for line numbers by setting the following resources to either True or False in the resource file (see Section 10.10.4).
DebugSource.StartupShowSourceLineno: True DebugInstruction.StartupShowInstLineno: True |
| Previous | Next | Contents | Index |
![[Site home]](../../images/buttons/bn_site_home_off.gif)
![[Send comments]](../../images/buttons/bn_comments_off.gif)
![[Help with this site]](../../images/buttons/bn_site_help_off.gif)
![[How to order documentation]](../../images/buttons/bn_order_docs_off.gif)
![[OpenVMS site]](../../images/buttons/bn_openvms_off.gif)
![[Compaq site]](../../images/buttons/bn_compaq_off.gif)
|
![[OpenVMS documentation]](../../images/openvms_doc_banner_bottom.gif) |
|
Copyright © Compaq Computer Corporation 1998. All rights reserved. Legal |
4538PRO_022.HTML
|