| Previous | Contents | Index |
PJL is a command language that allows job-level printer control. TBCP is a communications protocol for the serial, LAT, and parallel ports of a printer. It allows 8-bit binary data in files concurrent with the use of some control characters for communications and print job control. You cannot print TBCP to printers that do not support TBCP, or to ports other than the serial, LAT or parallel ports for printers.
The DEClaser 5100 printer is the first DIGITAL printer to support both
PJL and TBCP. Some Hewlett-Packard III series printers support PJL, and
most Hewlett-Packard IV series printers support both PJL and TBCP. When
a PC application is creating files for printing to these printers, the
files can include PJL and TBCP.
8.6.2 Steps to Prevent Problems with DECprint Supervisor
When printing files that include PJL, DCPS strips any PJL code from the file. This process allows DCPS to use PJL to switch print protocols in the printer, and enables the printing of these files on printers that do not support PJL.
If the interconnect to the printer is not serial or LAT, the file must
not use the TBCP. DCPS does not remove TBCP characters.
8.6.2.1 Preventing problems with PostScript
When the PC application is generating PostScript output, use the
following guidelines:
DCPS removes all PJL commands from PCL files, which may result in problems when printing these files. Because drivers for PCL Level 5 printers use PJL to select advanced printing features such as the configuration of the Resolution Enhancement hardware (RET), page protection, and print resolution, the print job may not print as expected without the PJL commands.
Moreover, the PCL is sent to the printer only if DCPS supports printing PCL directly to the printer. Otherwise, the PCL (Level 4) translator is used.
If problems arise with PCL output, an alternative would be to generate
PostScript output if the application allows for it.
8.7 Interaction Between Native PCL Printing and Automatic DATA_TYPE Detection
Jobs that use DATA_TYPE=AUTOMATIC=PCL may print with unexpected results. In particular, files printed as PCL which contain commands to switch to PostScript may be printed entirely as PCL. This result occurs if all of the following cases are true:
If the PCL language interpreter in a printer is used to print PCL files and a job includes multiple PCL files, the PCL files are concatenated. DCPS does not ensure that the files begin on new pages, or even that the last line of the first PCL file does not get printed over by the first line of the next PCL file. Concatenation can occur if:
If concatenated PCL files are not acceptable, the following workarounds can be used:
The DCPS-PLUS product includes a translator for Proprinter files, allowing PostScript printers to emulate the IBM Proprinter XL24. If your Proprinter file is not automatically recognized by the DECprint Supervisor software, you can explicitly specify the Proprinter data type using the DATA_TYPE parameter. For example:
$ PRINT/PARAMETERS=DATA_TYPE=PROPRINTER MYFILE.PRO |
Because of incompatibilities among Proprinter printers, files created for Proprinter models other than the XL24 printer may not print as expected. For best results, when producing a file to be printed using the Proprinter translator, specify the Proprinter XL24 as the printer model in your application. |
The DCPS translator for Proprinter files differs from the operation of the Proprinter XL24 printer in the following ways:
Documentation specifying the Proprinter language is available from IBM. The documentation specific to the Proprinter and the XL24 includes:
| IBM's Proprinter Family Technical Reference | IBM part number SC31-2587-3 |
| IBM's Proprinter X24E and XL24 Guide to Operations | IBM part number SA34-2106-0 |
DECprint Supervisor recognizes the Proprinter data type if the files have the following characteristics:
If your Proprinter file does not meet these criteria, you can
explicitly specify the data type by including the DATA_TYPE=PROPRINTER
parameter in your PRINT command.
9.3 Modifying the Default State of the Proprinter Translator
The default state of the XL24 can be modified from its front panel and from its DIP switches. Emulate these settings in your print job using PRINT parameters and the translator-specific front panel escape sequences. Table 9-1 shows the print attributes that you can modify using PRINT parameters.
| Print Attribute | PRINT Parameter | Reference |
|---|---|---|
| orientation | /PARAMETERS=PAGE_ORIENTATION | Section 1.4 |
| tray selection | /PARAMETERS=INPUT_TRAY 1 | Section 4.1 |
| paper size | /PARAMETERS=PAGE_SIZE | Section 11.7 |
All of the print attributes on the XL24 front panel and DIP switches can be modified in the Proprinter translator using the appropriate front panel mode escape sequence.
The format of the front panel mode escape sequence is:
Escape Sequence Format
ESC ` count-low count-high item-id new-value-low [new-value-high] |
Decimal Values
027 096 |
This format shows spaces between the elements of the command for clarity. Do not include spaces in your actual command. |
This escape sequence allows you to specify:
Do not use ASCII encoded numerals (1, 2, 3,...) to specify the count bytes, item-id, and new-value in the escape sequence. Instead, use ASCII characters whose numeric codes represent the values you want. For example, zero is represented by the NULL code; 126 is represented by the tilde character (~).
The print attributes that you can change using this escape sequence are listed in Table 9-2. The item-id is listed first, followed by a description of the print attribute. The third column shows the default Proprinter translator behavior for this print attribute. The last column shows how to present the value for each item.
| Item-Id | Description | Default Translator Value | You Specify ... |
|---|---|---|---|
| 2 | Slashed 0 | Default: 0 | 1 or 0. |
| 3 | Auto NL | Default: 0 | 1 or 0. |
| 4 | Form length | Default: based on logical page length. See Section 9.4.2. | The page length in points (72 units per inch). Any value is allowed. |
| 5 | Character set | Default: Set 1 |
1 indicates character set 1.
2 indicates character set 2. |
| 6 | Auto CR | Default: 0 | 1 or 0. |
| 7 | Margins | Default: based on logical page width. See Section 9.4.2. | The page width in points (72 units per inch). Any value is allowed. |
| 8 | Ignore FF | This determines whether form feeds are ignored at the top of form. Default: 1 | 1 or 0. |
| 12 | 12 cpi comp. | There are three options: 12, 17.1, or 20 cpi. Default: 12 |
2 indicates 12 cpi.
3 indicates 17.1 cpi. 4 indicates 20 cpi. |
| 13 | Code page | Default: 437 | The code page value: 437 or 850. |
| 14 | AGM | Default: disabled | 1 or 0. |
| 16 | Left offset | Default: 18 points (1/4 in.) | The left offset in points. Any value is allowed. |
| 17 | Top offset | Default: 36 points (1/2 in.) | The top offset in points. Any value is allowed. This is the position of the baseline of the first line of the file. |
| 19 | Characters per inch | Default: 10 cpi |
1 indicates 10 cpi.
2 indicates 12 cpi. 3 indicates 17.1 cpi. 4 indicates 20 cpi. 5 indicates proportional. |
| 20 | Emphasize | Default: 0 | 1 or 0. |
| 21 | Dbl Wide | Default: 0 (single) | 1 or 0. |
| 22 | Dbl High | Default: 0 (single) | 1 or 0. |
| 23 | Printer ID | Number for use with ERDPR. Default: 23 | The printer ID number. |
| 24 | 9-wire or 24-wire downloaded fonts |
A flag that determines 9-wire (0) or 24-wire (1) emulation. This is
required so that appropriate downloaded fonts are selected with ESC I.
Default: 24-wire |
1 or 0. |
| 25 | Grey bitmaps | A flag that is true if bitmaps are printed dark gray (85% black). Default: 0 | 1 or 0. |
| 26 | Printer ID | Number for use with ERSIC. Default: 3 | The printer ID number. |
| 27 | Alternate dots |
A flag that determines whether alternate dots are dropped in certain
graphics modes.
Default: 0 |
1 or 0. |
The front panel mode commands affect the way a file is printed if the commands are in a setup module and the setup module is specified with the file in the PRINT command. To use front panel commands to affect a print job, use the following procedure:
$ PRINT/QUEUE=PS$A14/PARAMETERS=DATA_TYPE=PROPRINTER/SETUP=module-name file-name.DAT |
The system manager can include the setup module in a form definition, which can be associated with a queue by default. In this case, you need only specify the data file name and the queue name in the PRINT command.
For example, to change the default character set of the translator from code page 437, character set 1, to code page 850, character set 2, create a setup module that contains the following escape sequence:
Escape Sequence Format
ESC ` ETX NUL CR R ETX ESC ` STX NUL ENQ STX |
Decimal Values
027 096 003 000 013 082 003 027 096 002 000 005 002 |
These examples show spaces between the elements of the command for clarity. Do not include spaces in your actual command. |
To change the translator from printing on just 10 inches of a letter-size sheet to printing on all 11 inches of the sheet, create a setup module that includes the following escape sequences:
Escape Sequence Format
ESC ' STX NUL DC1 LF ESC ' ETX NUL EOT CAN ETX |
Decimal Values
027 096 002 000 017 010 027 096 003 000 004 024 003 |
This front panel command changes the top offset to 10 points, and sets
the text length to 11 inches. Because most laser printers cannot print
on the entire sheet, you may need to scale the page using the NUMBER_UP
or LAYUP parameters to fit within the printable area.
9.4 Changing the Printable Area
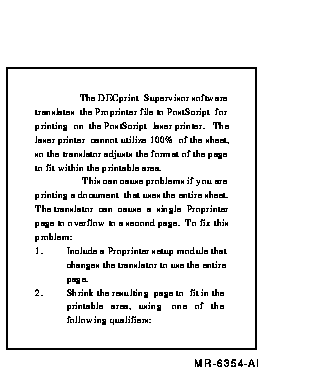
Applications that create files for Proprinter print jobs assume that the entire page is available for printing. Dot matrix printers, such as Proprinter devices, use the full page. Laser printers, such as those supported by the DECprint Supervisor for OpenVMS software, have a printable area that is often smaller than the entire page, and leave a blank margin around the printable area.
The software that translates Proprinter files for PostScript printing formats the text so that it prints only within the printable area on the laser printer. Specifically, the translator formats the text so that it does not print within 1/4 inch of the left and right edges of the page, nor within 1/2 inch of the bottom edge. The first line of a file prints with its baseline 1/2 inch from the top edge of the page. This is illustrated in Figure 9-1.
Figure 9-1 Proprinter Default Printable Area

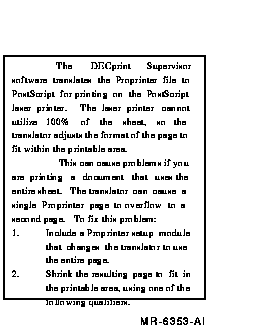
9.4.1 Proprinter Files That Do Not Fit on the Page
When you print a Proprinter file, you may find that a page that should
fit on one page requires two pages, as shown in Figure 9-2.
Figure 9-2 Proprinter Page on Two PostScript Pages

You can correct this problem by using a setup module that causes the translator to put more lines on the page.
For example, to change the translator from printing on 10 inches of a letter-size sheet to printing on 11 inches of the sheet, create a setup module to scale the page. Include the following escape sequences:
Proprinter Escape Sequence Format
ESC ' STX NUL DC1 LF ESC ' ETX NUL EOT CAN ETX
|
Decimal Values
027 096 002 000 017 010 027 096 003 000 004 024 003
|
These examples show spaces between the elements of the command for clarity. Do not include spaces in your actual command. |
This changes the top offset to 10 points, and sets the text length to 11 inches.
The new output may also need to be scaled because the text prints off the bottom of the page (see Figure 9-3).
Figure 9-3 Proprinter Page Too Long
You can correct this problem by scaling the page image. To scale the page image, specify any one of the following for the print job:
/PARAMETERS=NUMBER_UP=1 /PARAMETERS=LAYUP_DEFINITION=BORDERS /PARAMETERS=LAYUP_DEFINITION=layup-file-name |
The DECprint Supervisor for OpenVMS software includes an example layup definition file that shrinks the size of the logical page to fit within the normal laser printer margins. The example file PROPRINTER-FULL-PAGE.LUP is supplied in SYS$COMMON:[SYSHLP.EXAMPLES.DCPS]. Ask your system manager to copy it to the DCPS$LAYUP area if it is not already there. Then you can specify the layup definition file in the PRINT command, as follows:
$ PRINT file.PRO/PARAMETERS=LAYUP_DEFINITION=PROPRINTER-FULL-PAGE/NOTIFY |
The final output is illustrated in Figure 9-4.
Figure 9-4 Proprinter Page Adjusted to Fit PostScript Page
| Previous | Next | Contents | Index |