


Common Desktop Environment: User's Guide
6 Running Applications from the Desktop
Contents of Chapter:
- Running Applications Using Application Manager
-
 To Open Application Manager
-
- Application Manager Window
-
 To Run an Application from Application Manager
-
 To Get Help on an Application Icon
-
 To Put an Application Icon in the Front Panel
-
 To Put an Application Icon on the Workspace Backdrop
-
 To Update Application Manager
-
 To Create a Personal Application Group
-
 To Add Applications to a Personal Application Group
-
- Advanced Application Manager Concepts
-
- Running Applications Using File Manager
-
 To Run an Application from File Manager
-
- Running and Organizing Applications Using the Front Panel
-
 To Put an Application in the Personal Applications Subpanel
-
 To Run an Application from the Personal Applications Subpanel
-
 To Replace the Main Panel Personal Applications Control
-
- Running Applications from a Terminal Emulator Window
-
 To Start an Application on Your System Using a Terminal Emulator
-
 To Start an Application on Another System Using a Terminal Emulator
-
This chapter covers several ways to run applications from the desktop.
Application Manager is a container for the applications and other tools available on your system. Most of the applications and tools in Application Manager were placed there by your system administrator or are built into the desktop.
Although configuring Application Manager is primarily a system administration task, you can also make personal customizations to Application Manager.
The Application Manager window is a special File Manager view of a special folder on your system. It looks very much like a File Manager window, except that the iconic and text path are not shown.
Figure 6-2 Top-level folder of Application Manager
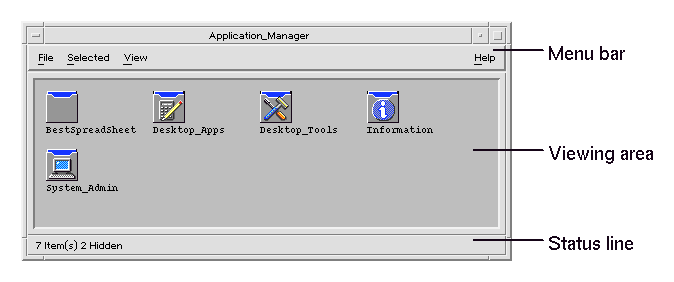
The top level of Application Manager is special because other folders and files are never created directly in it. Instead, folders in other locations are gathered into this location automatically when you log in.
The top level of Application Manager contains a set of application groups.
Figure 6-3 Top level of Application Manager
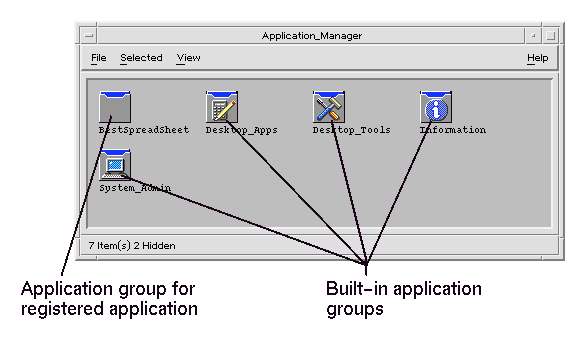
Each application group is a folder containing one or more icons that you use to start applications.
An icon that starts an application is called an action icon or application icon.
Figure 6-4 Action (application) icons in the Desktop_Apps application group
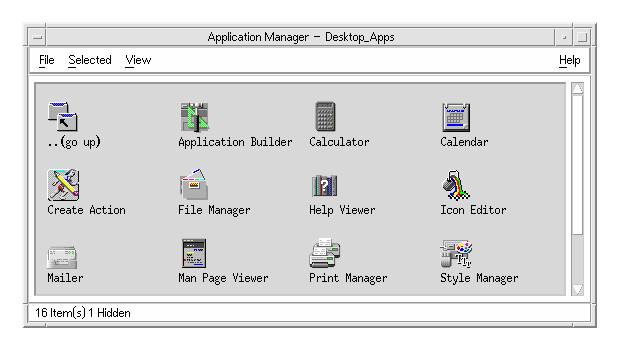
Some application groups contain other useful application files such as sample data files, templates, and ``read me'' files.
The application groups in your Application Manager are either built in or registered by your system administrator. Application registration is a process by which an application lets the desktop know of its presence.
The application groups in Application Manager are gathered together each time you log in. The application groups may be located on your system or on other systems throughout the network.
The desktop provides these built-in application groups that are containers for various tools and utilities available on your system:
- Application Group
- Contents
- Desktop_Apps
- Desktop applications such as File Manager, Style Manager, and Calculator
- Desktop_Tools
- Desktop administration and operating system tools such as Reload Application, vi text editor, and Check Spelling
- Information
- Icons representing frequently used help topics
- System_Admin
- Tools used by system administrators
Application Manager Menus and Commands
Since Application Manager is closely related to the File Manager window, it uses most of the same menus, commands, and other features.
For more information about using the Application Manager menus and dialog boxes, see Chapter 5, "Managing Files with File Manager."
- Open Application Manager.
- Double-click the application group's icon to display its contents.
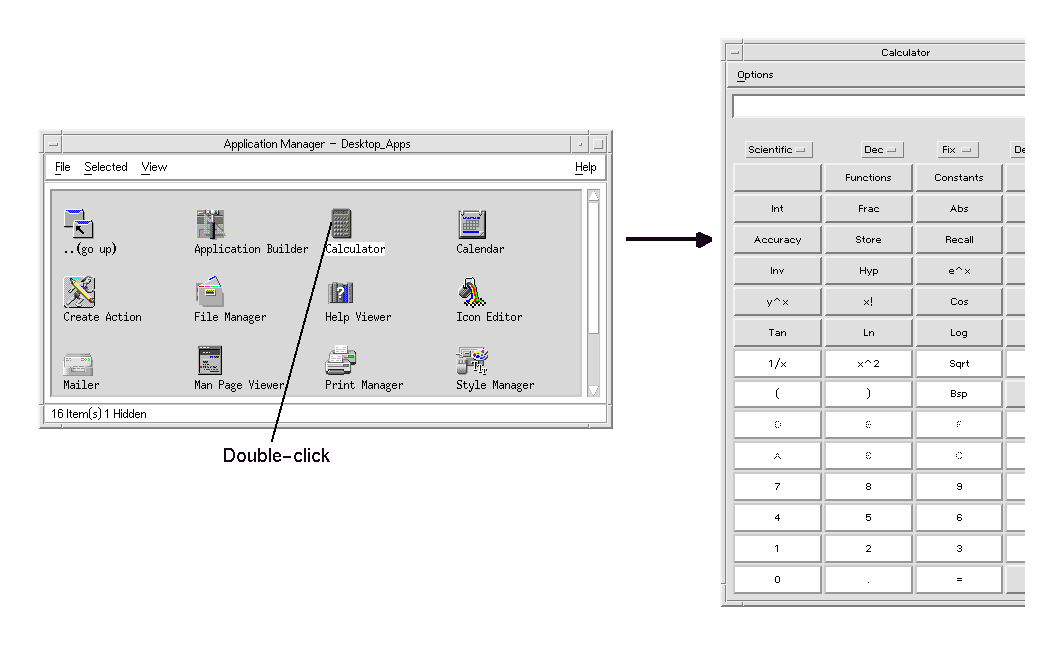
- Double-click the application's action icon.
Figure 6-5 Opening an application window from Application Manager
Using the Icon's Pop-up Menu
- Point to the icon and press mouse button 3 to display its pop-up menu.
- Choose Help from the pop-up menu.
Using the Help Menu
- Choose On Item from the Help menu.
- Click the icon on which you want help.
- Display the application's icon in Application Manager.
- Display the subpanel to which you want to add the application.
- Drag the action icon from Application Manager to the Install Icon control in the subpanel.
Figure 6-6 Installing an application (action icon) in the Front Panel
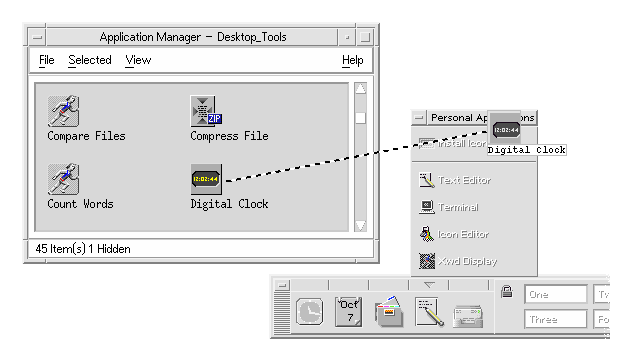
This procedure copies an application icon from Application Manager to the workspace (backdrop). This makes the icon available when you don't have an Application Manager window open.
- Open the application group containing the application you want to add.
- Drag the application from Application Manager to the workspace backdrop.
The contents of your Application Manager are built each time you log in. Each time it is built, it searches certain system and network locations for applications.
If your system administrator adds an application to your system or to an application server while you are in a session, you must update your Application Manager if you want the new application to be registered immediately.
There are two ways to update Application Manager:
- Open the Desktop_Tools application group and double-click Reload Applications.
- Or, log out and back in.
 To Create a Personal Application Group
A personal application group is an application group that you can alter, since you have write permission to it.
- From your home folder, change to the .dt/appmanager subfolder.
- Create a new folder.
The folder name will become the name of the new application group.
- Double-click Reload Applications in the Desktop_Apps application group.
Your new application group will become registered at the top level of Application Manager.
 To Add Applications to a Personal Application Group
Advanced Application Manager Concepts
This section describes several advanced Application Manager concepts:
- The relationship between file names and icon labels
- The folder location of Application Manager
- Creating personal actions and data types
- Where to obtain additional information about customizing Application Manager
In File Manager and Application Manager, files and folders are represented as icons, and these icons are usually labeled with the file name. Action icons are sometimes an exception to this rule.
For example, display the pop-up menu for the action icon in the Desktop_Tools application group labeled Digital Clock. Notice that the file name, which is shown at the top of the pop-up menu, is not the same as the label.
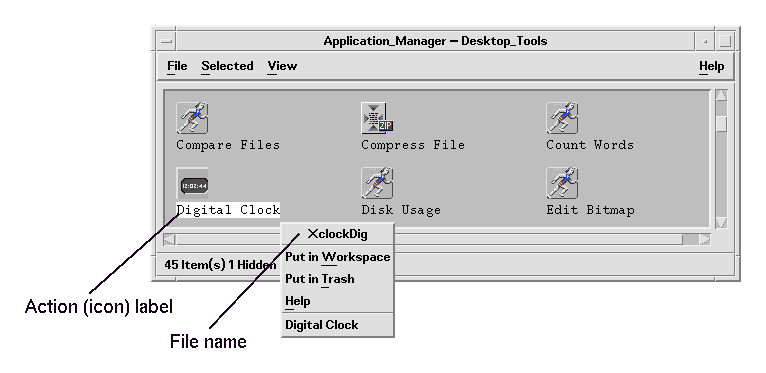
In most cases, you do not need to know the action file name. However, there are other situations, in addition to the pop-up menu, where you may see the file name.
For example, if you use the Copy File dialog box to copy the icon (by selecting the file and choosing Copy to from the Selected menu), the dialog box will display the file name.
Application Manager behaves very much like File Manager. This is because Application Manager is a File Manager view of a special folder on your system used to gather registered applications. Ordinarily, you do not need to know the location of this special folder. However, its location may be useful to you if you are trying to troubleshoot problems.
Login Manager creates the Application Manager folder each time you log in. Its location is:
/var/dt/appconfig/appmanager/special_folder_name
where special_folder_name is a name assigned by the system that is unique for your system and login name.

Caution: You should never attempt to directly modify the special_folder_name folder from a command line.
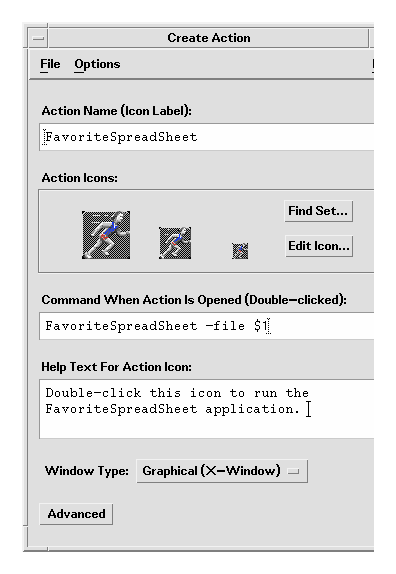
The desktop provides a tool that helps you create icons for running scripts, applications, and other commands. You may want to use this tool if you have a personal application your system administrator has not configured for you.
For example, suppose you have your own favorite spreadsheet application that you usually start by typing a command into a terminal emulator window:
FavoriteSpreadSheet -file data_file
You can create an icon that runs this command so that you won't have to continue manually typing it. To do this, you must create a special desktop ``macro'' called an action. You can also create a data type for the data_files if you like.
The desktop includes a tool called Create Action that makes it easy to create actions and data types. To open the Create Action window, double-click the Create Action icon in the Desktop_Tools application group.
Figure 6-7 Create Action window
To see online instructions for using the window:
- Choose Tasks from the Create Action window's Help menu.
- Click the hyperlink ``To Create an Action With Create Action.''
Create Action:
- Creates an action for your application
- Places an action icon in your home folder.
You can move or copy that icon to other locations--for example, to a personal application group that you've created.
When an application is registered in Application Manager, it has its own application group. This application group is available to all users on the system.
Registering applications is an advanced task, since it requires you to be the root user. For instructions, see CDE Advanced User's and System Administrator's Guide ."
If an application uses data files, it may be configured so that the application can be started from File Manager using any of its data files.
 To Run an Application from File Manager
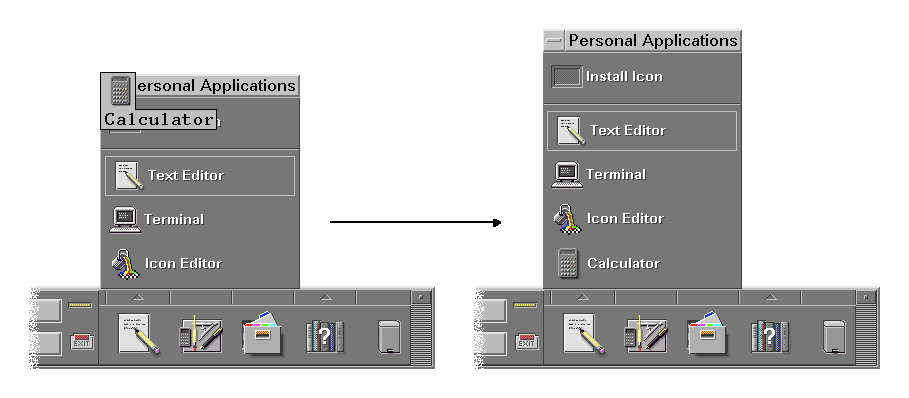
The Personal Applications subpanel is a container for applications you use frequently.
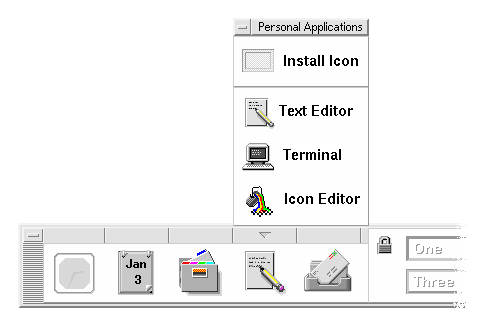
Initially, it contains:
- Install Icon
- Drop zone for adding applications to the subpanel.
- Text Editor
- Duplicates the control in the Main Panel. Opens the desktop Text Editor.
- Terminal
- Starts the desktop terminal emulator for entering commands manually.
- Icon Editor
- Starts the desktop Icon Editor for creating and editing bitmaps and pixmaps.
- Open the application group containing the application you want to add.
- Display the subpanel to which you want to add the application.
- Drag the application from Application Manager to the Install Icon control in the Personal Applications subpanel.
 To Run an Application from the Personal Applications Subpanel
 To run the application, click its control.
If the application icon that was installed in the subpanel is a drop zone, the control is a drop zone too. You can run an application by dragging a data file from File Manager to its control.
Initially, the Main Panel contains the Text Editor control. You can replace the Text Editor control with the control of your choice.
- Add the application you want in the Main Panel to the Personal Applications subpanel.
See "To Put an Application in the Personal Applications Subpanel".
- In the Personal Applications subpanel, point to the control you want in the Main Panel and choose Copy to Main Panel from the control's pop-up menu.
A terminal emulator is an application whose window provides a command line. The command line lets you type commands into your system--for example, operating system commands, script names, or commands that run applications.
All applications have a command that users can type to start them. The application's documentation usually describes how to use the command.
The desktop provides a terminal emulator called dtterm. Your system may include other terminal emulators.
To open a terminal emulator window, click the Terminal control in the Personal Applications subpanel.
For more information on using dtterm, see Chapter 12, "Using Terminal."
 To Start an Application on Your System Using a Terminal Emulator
 Type the command that starts the application into the terminal emulator window.
If the application has its own window, you should add an ampersand character (&) to the end of the command. This runs the application ``in the background,'' which lets you continue using the terminal emulator window while the application is running.
For example, the following command runs the load meter program xload in the background:
/usr/bin/X11/xload &
 To Start an Application on Another System Using a Terminal Emulator
There are two ways to use a command line to start an application on another system:
When you use rlogin, you use your terminal emulator to log in to a different (remote) system. You then run the command to start the application on that system.
- Use the rlogin command to log in to the system containing the application.
rlogin remote_system_name
For example:
rlogin systemA
- Type the command to start the application. Use the -display option to send the window back to your display.
For example, assuming your own system's display name is MySystem:0:
/usr/bin/X11/xload -label systemA -display MySystem:0
The term rsh stands for "remote shell." It provides a one-step way to run an application, since you do not have to log in before running the command.
 Type the command:
-
rsh remote_system_name -n command
- The command must include the -display option to send the window back to your display.
- For example:
-
rsh systemA -n /usr/bin/X11/xload -display MySystem:0


Generated with CERN WebMaker
To Open Application Manager
To Run an Application from Application Manager
To Get Help on an Application Icon
To Put an Application Icon in the Front Panel
To Put an Application Icon on the Workspace Backdrop
To Update Application Manager
To Create a Personal Application Group
To Add Applications to a Personal Application Group


