![[Compaq]](../../images/compaq.gif)
![[Go to the documentation home page]](../../images/buttons/bn_site_home.gif)
![[How to order documentation]](../../images/buttons/bn_order_docs.gif)
![[Help on this site]](../../images/buttons/bn_site_help.gif)
![[How to contact us]](../../images/buttons/bn_comments.gif)
![[OpenVMS documentation]](../../images/ovmsdoc_sec_head.gif)
| Document revision date: 10 November 2000 | |
![[Compaq]](../../images/compaq.gif) |
![[Go to the documentation home page]](../../images/buttons/bn_site_home.gif)
![[How to order documentation]](../../images/buttons/bn_order_docs.gif)
![[Help on this site]](../../images/buttons/bn_site_help.gif)
![[How to contact us]](../../images/buttons/bn_comments.gif)
|
![[OpenVMS documentation]](../../images/ovmsdoc_sec_head.gif)
|
|
| Previous | Contents | Index |
Pop-up menus provide users with shortcuts for accessing pull-down menu items.
Because pop-up menus appear at the current pointer position when MB3 is
pressed, users do not need to move the mouse very far. Pop-up menus
allow users to keep their attention focused on their work while
choosing an action. Invoking functions exclusively from pull-down menus
and dialog boxes can require extensive mouse movements, resulting in
lower productivity.
2.5.1 Characteristics to Give to Pop-up Menus
Design the pop-up menus to have the following characteristics:
Figure 2-6 Pop-up Menu
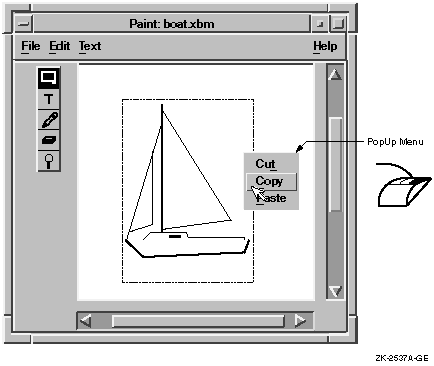
Organize pop-up menus in one of the following manners:
Include the most frequently used functions of your applications in pop-up menus. Pop-up menus may contain a heterogeneous group of functions. Because pop-up menus act as accelerators, they require less rigid categories of items than do pull-down menus.
There are two ways to implement pop-up menus:
Have items in a pop-up menu act on the current selection (if there is one), according to the following guidelines:
Make your application do one of the following two things if users have not selected any items:
Pop-up menus provide users with quick and direct access to application
functions. Control panels and modeless dialog boxes that contain push
buttons perform a similar role. Use pop-up menus when users are
focusing on the work area, and when moving the mouse between the
control panel and work area would be distracting. Use a control panel
or a modeless dialog box when users want the controls to be constantly
visible. You can also use tear-off menus to give the user the choice of
keeping the controls visible. (See Section 2.6 for information about
tear-off menus.)
2.5.4 Designing Pop-up Menus with Submenus
When combining pop-up menus with submenus, follow these guidelines:
Figure 2-7 illustrates a pop-up menu with a submenu.
Figure 2-7 Pop-up Menu with a Submenu
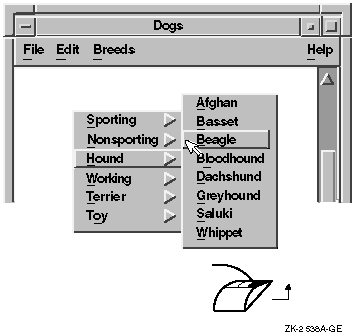
A tear-off menu is one that can be torn off into a secondary window. After the menu is torn off, the user can position it and use it in the same way as a dialog box.
When menus are torn off, they appear in a separate window that can be directly accessed. Tear-off menus should be used when elements in a menu can be activated many times in succession. Pull-down, option, cascade, and pop-up menus can all become tear-off menus.
For example, the View pull-down menu, which can contain different views as well as Expand and Collapse items, is a good candidate for a tear-off menu. Most Options pull-down menus, which are used infrequently, might not be appropriate for tearing off. However, Options menus for setting the font family and size for desktop publishing applications are good candidates for becoming tear-off menus.
You should avoid creating tear-off menus from pop-up menus that are context sensitive, with items changing depending on the location of the pointer.
To set the tear-off attribute of a menu, set the XmNtearoffModel resource for the pull-down menu:
|
The File menu provides commands that allow users to manage files. Place the File menu to the far left in the menu bar (in left to right environments), and give it a mnemonic of F. The mnemonic allows a user to press a single letter on the keyboard in order to select a menu item. Indicate the mnemonic with an underscore.
Motif recommends the following menu items for the File menu:
You can improve the usefulness of the File menu by adding the following items:
Figure 2-8 shows a File menu with Digital's additional menu items in the recommended order.
Figure 2-8 A File Menu and Its Menu Items
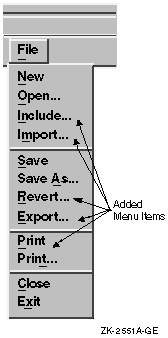
Group the menu items according to the following:
The functions of the File menu items are as follows:
New
The New menu item must open a new file in the current window. It must clear existing data from the client area and update the current file name. If users specify a new file name, you can display the file name in the title area or in a status area with a full pathname. If they do not specify a file name, display the term "Untitled" in the title area. Digital suggests that if you give New an accelerator, make the accelerator Ctrl+N.To accommodate users who already have a file open when they choose the New menu item, have your application display a question message box that asks if users want to save the file. Figure 2-9 shows a question message box that does this.
Open...
The Open menu item must open an existing file. When users click on this item, it must bring up a dialog box that prompts users for the name of the file. Digital suggests that if you give Open an accelerator, make the accelerator Ctrl+O.To accommodate users who already have a file open when they choose another file to be opened, you can do either of the following:
- Have your application display a question box that asks if users want to save the file before closing it and opening another. Figure 2-9 shows a "save file" question message box.
Figure 2-9 A" Save File" Question Message Box
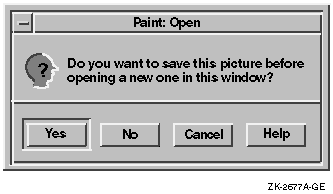
Figure 2-10 An" Open in New Window" Check Box in an Open File Dialog Box
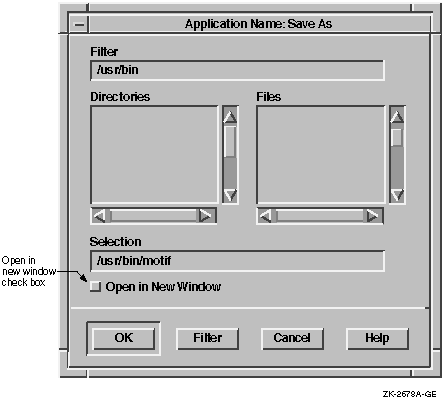
If your application runs on an operating system that does not save multiple versions of a file (for example, UNIX or Windows NT operating systems), you can have a message box displayed to warn users whenever saving a file with the name they specified will cause the application to overwrite an existing file. If your application will run on a variety of platforms, you could make the display of this warning message customizable.
When users choose Save As, they usually want to keep the newly named file in the same directory as the current file. If you use a file selection box in a Save As operation, initially set the directory to match the directory of the open file. If the user has performed a Save As operation before, leave the directory in its previous state.
Figure 2-11 A Save As Dialog Box That Allows Users to Save in Different File Formats
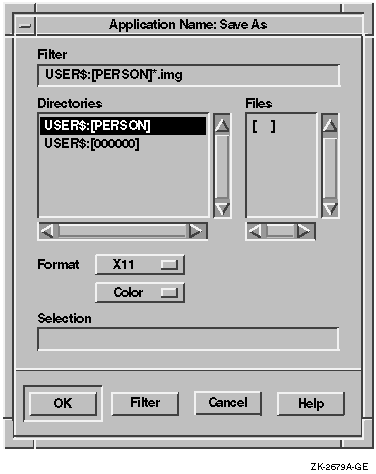
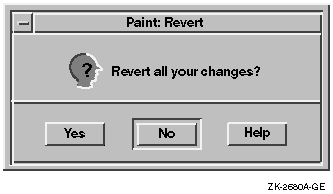
Figure 2-12 shows a dialog box displayed by activating the Revert menu item.
Figure 2-12 A Revert Dialog Box
Closing the last primary window is the same as exiting the application. Use the following guidelines to help you decide what constitutes the last primary window:
If users can lose data by closing the last window, provide a message box that prompts users to save changes.
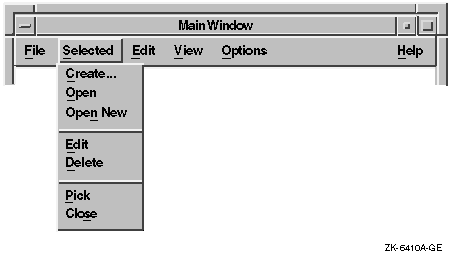
The Selected menu is optional. It contains items that refer to the selected objects in the window. For example, in a mail application, the selected objects could include drawers, folders, or messages. The user would select a series of mail folders and then display the Selected menu. The menu items would apply to the selected folders.
Figure 2-13 shows a standard menu bar that contains a Selected menu with seven menu items. You can use different menu items that are appropriate for your application.
Figure 2-13 A Selected Menu and Its Menu Items
Note that the File menu differs from the Selected menu. The File menu contains operations for the application as a whole, as well as file-like actions; the Selected menu items apply only to those objects that the user has just selected.
If an object can be opened in one of several views, consider using a cascade menu for the Selected menu item. For example, if you want the user to be able to open a directory in either an icon or tree view, use a cascade menu instead of a generic Open menu item.
    Open-> Icon View
           Tree View
|
The Edit menu provides commands that allow users to manipulate text or graphics within a file and between files. Place the Edit menu to the right of the File menu, or Selected menu if one is defined, in left to right environments, and give it a mnemonic of E.
Motif recommends the following items in the Edit menu:
You can enhance the usefulness of this menu by adding the following items:
Figure 2-14 shows an Edit menu with the additional menu items.
Figure 2-14 An Edit Menu and Its Menu Items
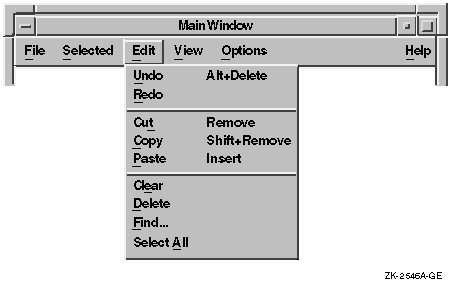
Group the menu items according to the following:
The functions of the Edit menu items are as follows:
Undo (Alt+Delete), Redo
The Undo menu item must reverse the effects of a previous operation. The Redo menu item reverses the effects of an Undo operation.There are two forms of Undo --- single-level and multilevel --- as follows:
- If your application supports only single-level Undo, the Undo item appears in the menu by default. Once users perform an Undo operation, make the menu item change to Redo until users perform another action that reenables Undo.
- If your application supports multilevel Undo, include menu items for both Undo and Redo. Once users perform an Undo operation, they can either perform another Undo or choose Redo.
When an Undo operation is not possible in a given context, disable the Undo menu item. For example, when users open a file, keep the Undo menu item disabled until they make a change to the file. If your application does not support the Undo function, do not display the Undo menu item in the Edit menu.
You can make the Undo operation more specific by altering the menu item for Undo as the function changes. For example, change the label of the menu item to any of the following when appropriate:
- Undo Cut
- Undo Paste
- Undo Rotate
- Undo Typing
- Undo Fill
- Undo Font
Once a user operation is undone, have your application support redoing the operation. For example, change the label of the menu item to any of the following when appropriate:
- Redo Cut
- Redo Paste
- Redo Rotate
- Redo Typing
- Redo Fill
- Redo Font
Cut (Remove)
The Cut menu item must transfer selected information to the clipboard and delete the information from your application. Decide whether the area that was occupied by the removed data is left blank or whether the remaining data fills the space. Usually graphics applications leave the space blank, while text applications fill the space with the remaining text.Copy (Shift+Remove)
The Copy menu item must transfer the selection to the clipboard without removing the original data from the client area. Do not allow this action to alter data in your application.Paste (Insert Here)
The Paste menu item must copy data from the clipboard into the application. When there is more than one possible destination for the paste, use the following guidelines:
- When the focus policy is explicit, paste data to the control with the keyboard focus.
- When the focus policy is implicit (pointer), paste data to the control with the destination cursor. This guideline applies only for text widgets.
- Allow users to place the selected data by dragging an outline of the data to be pasted around the screen using MB2, and dropping it in the desired location by releasing MB2.
Decide whether the pasted data is reformatted to fit in the client area. Text applications usually reformat the pasted data to fit into the margins of the text field; graphics applications usually do not.
Do not allow Paste to affect the contents of the clipboard.
In addition to the Edit menu items, you should implement the Motif drag-and-drop functions.
Clear
The Clear menu item must delete the selection without copying it to the clipboard. The Clear menu item does not compress the remaining data to fill the space that was occupied by the cleared data. Users must be able to undo a clear operation.Delete
The Delete menu item must remove the current selection without copying it to the clipboard. Make Delete compress the remaining data to fill the space that was occupied by the cleared data. Allow users to undo a delete operation.Find...
The Find menu item enables users to search for an object that they specify. When they select the Find menu item, make a search dialog box appear.Select All
Make the Select All menu item select all the data in the file, not just the data that is currently visible.
| Previous | Next | Contents | Index |
![[Go to the documentation home page]](../../images/buttons/bn_site_home.gif)
![[How to order documentation]](../../images/buttons/bn_order_docs.gif)
![[Help on this site]](../../images/buttons/bn_site_help.gif)
![[How to contact us]](../../images/buttons/bn_comments.gif)
|
| privacy and legal statement | ||
| 5637PRO_004.HTML | ||