DECdocument
Graphics Editor User's Guide
for Motif
3.12 Working with a Second Window
When you create graphics, it is useful to be able to copy or move
graphics and text from one drawing to another. One way to do this is to
use a second window.
To perform operations across a second window, you need to select:
- New Window item on the Control menu from the Control Panel to open
a second window.
- Cross Window menu item on the Settings dialog box from the Options
menu of the Control Panel to let you perform operations across the
windows.
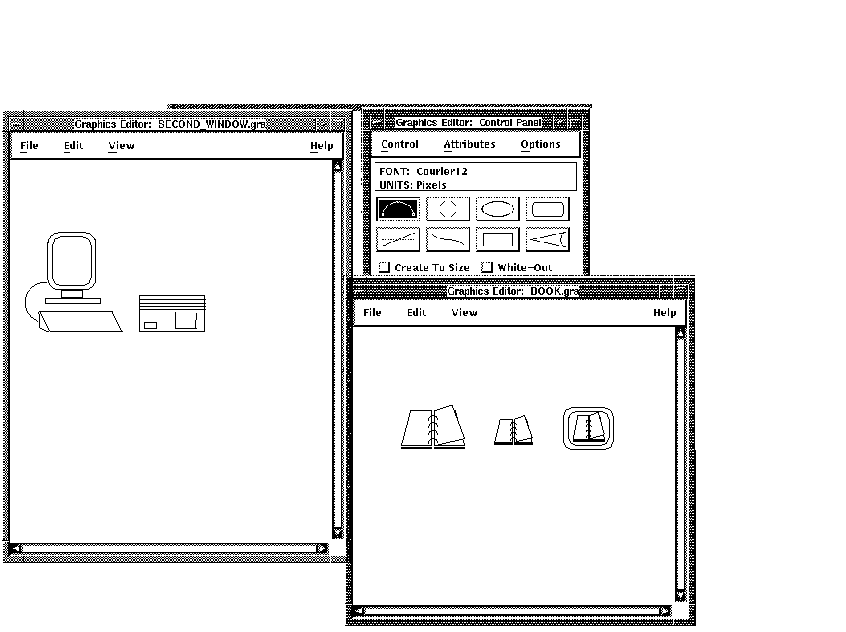
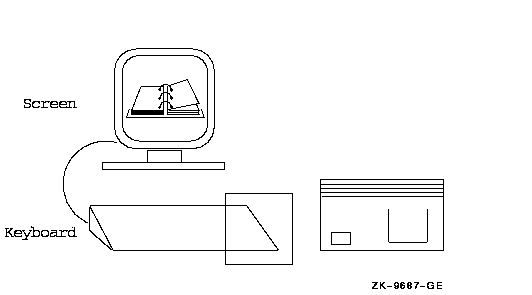
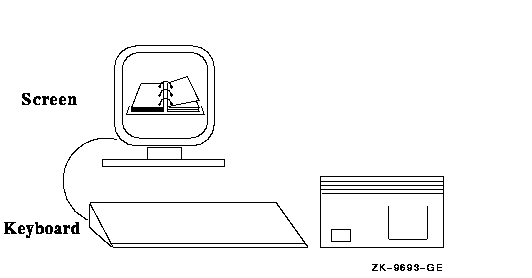
The following exercise shows you how to open a second window, include a
clipart file from the Artwork Gallery that contains drawings of an open
book, and copy one of the drawings to your workstation screen.
The Artwork Gallery is a collection of previously-drawn graphics that
is available to users of the Graphics Editor. If you cannot access the
clipart in the Artwork Gallery at the location given in this exercise,
see your system manager to see where the clipart library was stored at
installation.
- Choose New Window from the Control menu of the Control Panel. A
second window is opened.
- Drag the new window to the lower right corner of the screen or
another location so you can see the original window.
- Choose Clipart... from the File menu on the second window.
- Move the pointer to the Selection field and enter the following
file name:
SYS$SYSROOT:[SYSHLP.EXAMPLES.DOC_GRAPHICS]BOOK.GRA
|
A positioning box the size of the Artwork Gallery file appears in
the second window.
- Position the box in the window and click MB2. See Figure 3-5.
Figure 3-5 Artwork Gallery
- Use the Ungroup option on the Control Panel to ungroup all objects
in the Artwork Gallery file.
- Turn on Cross Window on the Setting dialog box of the Attributes
menu from the Control Panel.
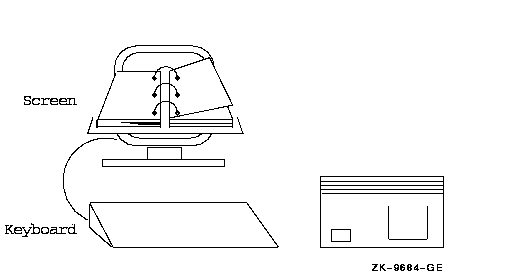
- Choose the Copy option on the Control Panel.
- Select the copy of the open book on the left.
- Click MB2, move a copy of the book to the main window, and place it
in the center of the workstation screen. Click MB2 to confirm. (The
book may be too large or too small for your screen but you will learn
to scale it later.)
- Click MB3 to conclude the Copy operation. The workstation should
look similar to the following figure:
- Choose Close from the File menu on the second window (the window
where the clipart is displayed).
The Close dialog box requests
whether you want to save any changes.
- Choose No. The second window is closed.
3.12.1 Summary of Working with a Second Window
You can do the following operations chosen from the Control Panel
across one or more windows:
| Option |
Decscription |
|
Copy
|
Make a copy of one or more objects and move the copy to another window.
|
|
Copy/Mirror
|
Make a mirror copy of one or more objects and move the copy to another
window.
|
|
Mirror
|
Mirror one or more objects and move them to another window.
|
|
Move
|
Move one or more objects to another window.
|
|
Rotate
|
Rotate one or more objects and move them to another window.
|
3.13 Scaling Objects
The Scale option on the Control Panel lets you enlarge or reduce part
or all of a graphics object.
Use the Scale Percent and Interactive settings on the Control Panel to
either set the percentage you want to scale the object or to scale the
object interactively. The Interactive setting must be off to use
percentage scaling.
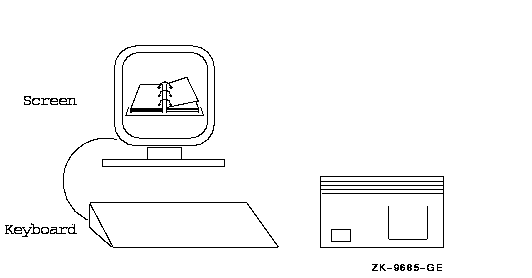
To use the Interactive setting to size the open book that you copied
from the Artwork Gallery to fit within the workstation screen:
- Choose the Scale option on the Control Panel.
- Turn on the Interactive setting.
- Select the open book. (If the screen is selected rather than the
book, click MB1, move the pointer to another point on the book, and
click MB1 to try again to select it.)
- Click MB2 to start the interactive scaling. When the book is the
right size to fit into the screen, click MB2 to confirm the size.
- Use the Move operation to center the book on the screen if needed
as shown here:
To use scale to size an object to a specific percentage:
- Choose the Scale option.
- Change the Scale Percent setting to 200.
- Turn off the Interactive setting.
- Select one of the copies of the system box.
- Click MB2. The system box is scaled 200 percent (twice its original
size) and the scaled box is in animation so you can move it to another
location.
- Move the system box to the desired location and click MB2 to
confirm the scaling.
To scale with the Horizontal constraint on:
- Turn on the Horizontal constraint indicator.
- Point select the system box again.
- Click MB2 to confirm. Note that the system box is now scaled only
horizontally.
- Click MB2 to confirm the scaling or click MB3 to cancel the scaling
and return the system box to its previous size.
- Turn off the Horizontal constraint indicator.
- Use the Delete option to delete all the extra system boxes. It is
faster to use the drag select method and delete all the boxes at once.
3.13.1 Summary of the Scale Option
Use the Scale Percent and Interactive settings as follows:
| Scale Percent |
Interactive |
Results |
|
Greater than 100
|
Off
|
Increase the size of the object.
|
|
Less than 100
|
Off
|
Reduce the size of the object.
|
|
Any number
|
On
|
Increase or reduce the size of the object manually, changing its size
as you move the pointer.
|
If you use horizontal or Verical constraints with the Scale option, the
object is enlarged or reduced in a horizontal or vertical direction as
specified. If you use both or no constraint settings, the object is
enlarged or reduced in both a horizontal or vertical direction.
Scaling is a cumulative operation. The Graphics Editor scales the object
based on the current object size. For example, if you scale an object
200 percent and then scale it again 50 percent, the object is returned
to its original size.
Scaling does not affect text. To enlarge or reduce text, use the Font
... menu item on the Attributes menu as explained in Section 3.18 or
Screen Capture the text as explained in Chapter 4 and then use the
Scale option.
3.14 Zooming Objects
The Zoom menu item on the View menu of the Drawing window lets you
temporarily magnify or reduce all the objects in the drawing window
(text is not affected by zoom). You might want to use zoom to make it
easier to add fine details on an object.
The Unzoom menu item on the View menu of the Drawing window lets you
return the graphic to its original size. You cannot do file operations
while you are using the Zoom option.
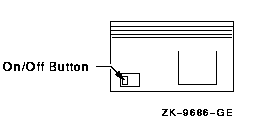
To use zoom to enlarge and add details to the On/Off button on the
system box:
- Choose Zoom from the View menu and choose 2x from the Zoom submenu.
The pointer changes to a mouse.
- Select the system box. The entire drawing is zoomed. Selecting the
system box helps to ensure that the box remains on the screen after the
zoom operation.
- Draw a small rectangle inside the On/Off button area to signify
the On/Off button as shown here:
- Choose Unzoom from the View menu to restore the graphic to its
original size.
3.14.1 Summary of Zoom and Unzoom Operations
The following table explains the effect of each of the zoom factor
settings:
| Zoom Factor |
Function |
|
1/4x
|
Reduce the graphic to one fourth the original size (25 percent).
|
|
1/2x
|
Reduce the graphic to one half the original size (50 percent).
|
|
2x
|
Enlarge the graphic two times the original size (200 percent).
|
|
3x
|
Enlarge the graphic three times the original size (300 percent).
|
|
4x
|
Enlarge the graphic four times the original size (400 percent).
|
|
To Box
|
Enlarge the selected part of the graphic to the size of the drawing
window. Use MB1 to draw a box around the part to zoom.
|
|
UserDef ...
|
Enlarge or reduce the original graphic to a user-specified factor, for
example, 2.5 times.
|
The Zoom operation is not cumulative. The Zoom operation affects the
original size of the object rather than the current size if the Zoom
operation has been performed.
3.15 Using the Edit Points Constraint
The Edit Points constraint on the Control Panel lets you change part of
an object while the rest of the object remains stationary. For example:
- If you have a rectangle, you can change the length or angle of its
sides, push or pull it into another shape, rotate it and modify it, or
make copies and modify the copies.
- If you have a line, you can stretch the line to make it longer or
shorter, rotate and stretch it, or make copies of it and modify the
copies.
Note
Turn the Edit Points constraint off when you are through using it. If
it is left on, the behavior of other options is affected.
|
To use the Edit Points constraint with the Move option to lengthen the
keyboard on your workstation drawing:
- Turn on the Horizontal constraint indicator.
- Turn on the Edit Points constraint indicator.
- Choose the Move option on the Control Panel.
- Drag select the two right-hand corners of the keyboard. Be sure
both corners are within the selection box as shown here:
- Release MB1. The two corner points are selected.
- Click MB2. Drag the right side of the keyboard to lengthen or
shorten it.
- Click MB2 to confirm the new size or click MB3 to cancel the
operation and try again.
- Turn off the Horizontal constraint indicator.
- Turn off the Edit Points constraint.
To use the Edit Points constraint again with the Copy option to
experiment with its capabilities:
- Choose the Copy option on the Control Panel.
- Make two copies of the keyboard and move them to another location
on the screen.
- Turn on the Edit Points constraint indicator.
- Point select the upper right corner of one of the keyboards.
- Click MB2. The pointer is positioned on the copy at the selected
corner. The original keyboard temporarily disappears.
- Move the pointer slightly and click MB2. Another copy appears.
- Move the next copy slightly and click MB2. Repeat this one more
time.
- Click MB3 to conclude the Copy operation. You should have a drawing
similar to the following:
To use the Edit Points constraint to select two points of the keyboard:
- Drag select both corners of the right side of the other copy of
the keyboard.
- Click MB2. The pointer is positioned at the right side of the
keyboard. Move the pointer slightly and click MB2. Another copy appears.
- Move the next copy slightly and click MB2. Repeat this one more
time.
- Click MB3 to conclude the Copy operation. You should have a drawing
similar to the following:
- Turn off the Edit Points constraint indicator.
- Use the Delete option to delete the extra keyboards.
3.15.1 Summary of Using Edit Points
Edit Points applies to all object shapes except the circle and ellipse
and can be used with the following editing options:
| Use Edit Points With: |
To: |
|
Copy
|
Make copies of the object and move the selected point or points on each
copy. This can give a three-dimensional appearance to the new object.
|
|
Copy/Mirror
|
Make mirror copies of the object and move the selected point or points
on each copy.
|
|
Mirror
|
Make a mirror image of the object and move the selected point or points
on the mirror image.
|
|
Move
|
Reposition the selected point or points on the object.
|
|
Rotate
|
Rotate the object the specified amount and move the selected point or
points.
|
|
Scale
|
Enlarge or reduce the object the specified amount and move the selected
point or points.
|
3.16 Using the Ignore All Groupings Constraint
The Ignore All Groupings constraint on the Control Panel lets you edit
a part of a polygon or one of a group of objects without disturbing the
remainder of the polygon or objects in the group. For example:
| If you have a... |
Use Ignore All Groupings to... |
|
Polygon
|
Perform one or more edit operations on one of the line or arc segments.
|
|
Group of objects
|
Temporarily ungroup the objects so you can perform one or more edit
operations without permanently ungrouping the objects.
|
You can use the Ignore All Groupings constraint with all object shapes
and with any editing option.
To use the Ignore All Groupings constraint to add another line at the
bottom of the keyboard, giving the keyboard some depth:
- Turn on the Ignore All Groupings constraint indicator.
- Choose the Copy option on the Control Panel.
- Point select the bottom line of the keyboard.
- Click MB2 to confirm the selection. A copy of the line appears.
- Move the copy of the line up slightly and click MB2 to fix it in
place.
- Click MB3 to conclude the Copy operation. The figure should appear
as follows:

- Turn off the Ignore All Groupings constraint indicator.
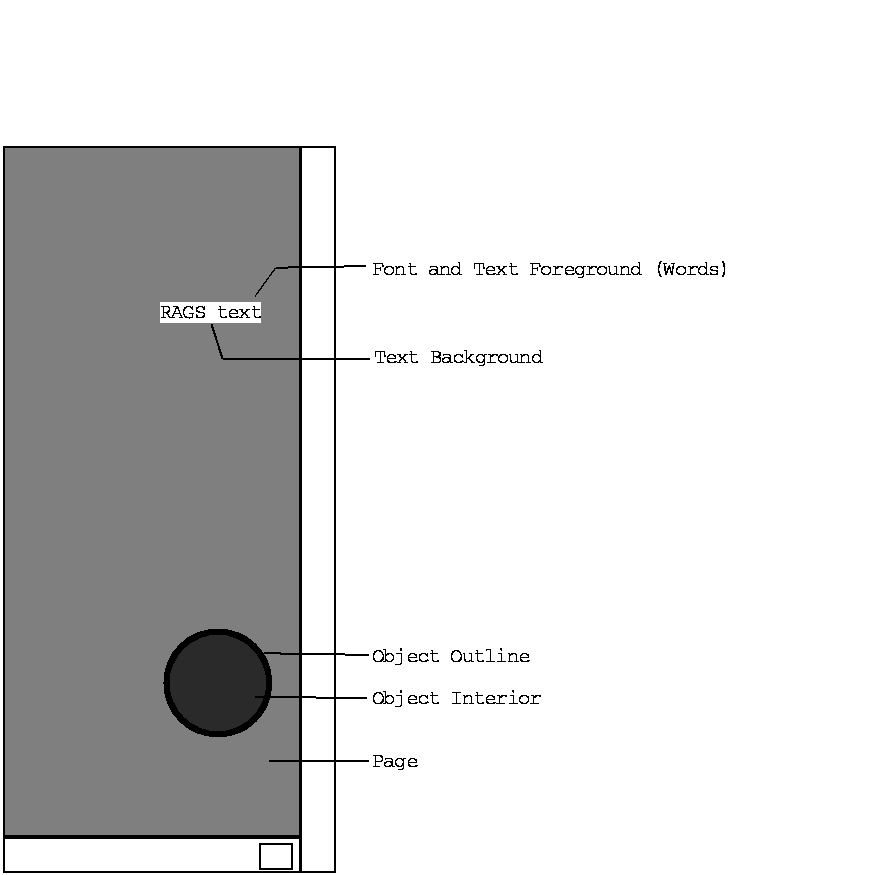
3.17 Using the Attributes Menu
The Attributes menu contains menu items for setting text fonts and for
setting text, object, and page colors and halftones. Figure 3-6
shows what each figure attribute applies to.
Figure 3-6 Figure Attributes
3.18 Changing Text Fonts
The Graphics Editor provides approximately 180 text font styles and sizes
for you to use when entering text. The default text font is 12-point
Courier. The current text font is displayed at the top of the Control
Panel in the Font field.
You change text fonts by using the Font ... menu item from the
Attributes menu, which displays the Font Dialog box show in
Figure 3-7.
Figure 3-7 Font Dialog Box

For more information on the Font dialog box, see the online help.
To change the font style and size of the labels on the workstation
drawing:
- Choose Font ... from the Attributes menu.
The Font dialog box
appears. Drag the box to another area of the screen so the drawing
window is visible.
- Display the Times_Bold14 font. (The fonts are in alphabetical
order.)
- Click on Times_Bold14 in the font selection area. The font sample
should show Times_bold14.
- Use extended select to select the Screen and Keyboard labels.
(Hold down the Shift key, click MB1 on the Screen label, and click MB1
on the Keyboard.)
- Choose Set Font from the Set to Object menu. The Screen and
Keyboard labels are changed to 14-point Times Bold font.
- Click on the Cancel button on the Font dialog box to remove the
box. The figure appears as follows:
3.19 Changing the Object Outline and Interior
Most objects you create have an outline and an interior. You change the
outline and interior using the dialog box displayed with the Object
Outline ... and Object Interior ... menu items from the Attributes menu.
Figure 3-8 Object Interior Attributes Dialog Box
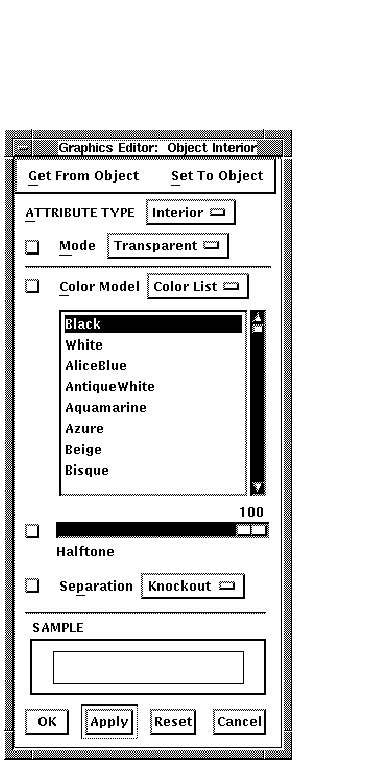
The Object Interior Attributes dialog box and the Object Outline
Attributes dialog box are very similar. (They are also very similar to
the Text Foreground ..., Text Background ..., Fonts ... and Page ...
dialog boxes.) Once you have one of these dialog boxes displayed, you
can display the others using the Attribute Type option menu.
To create a new object with new attributes, click on the Apply button
after you make changes on the Attributes menus. If you want to change
attributes on existing objects and you are using the Get From Object
and Set To Object options, you do not need to click on the Apply button.
For more information on the Attributes dialog boxes, see the online
help.
To change the object interior of the workstation screen:
- Choose Object Interior ... from the Attributes menu.
The Object
Interior Attributes dialog box appears. Drag the box to another area of
the screen so the drawing window is visible.
- Turn on the Halftone toggle indicator and drag the Halftone slider
to set a new halftone pattern. The figure in this example shows
halftone 26 as shown here:
- Turn on the Mode toggle indicator and set the mode to Translucent.
- Select the inside outline of the screen.
- Choose Set Marked Attributes from the Set To Object menu.
- The screen is changed to halftone 26 as shown here:
- Click on Reset to return the settings to the original values.
- Turn off the Mode and Halftone toggle indicators.
To change the line weight of the cable on the workstation drawing:
- Change the Attribute Type (at the top of the Attributes dialog box)
to Outline.
The Attributes dialog box is revised to reflect the
Object Outline attributes.
- Turn on the Line Weight toggle indicator and change the Line
Weight entry to 2.
- Select the cable.
- Choose Set Marked Attributes from the Set To Object menu.
- The cable is redrawn in a heavier line weight as shown here:
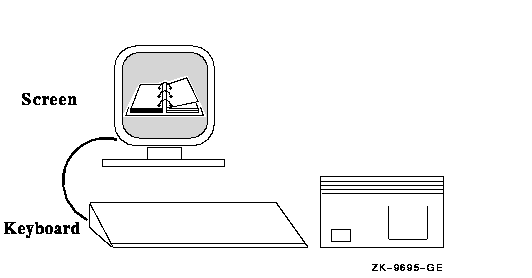
- Reset the line weight entry to 0 so future lines are drawn in the
default line weight.
- Click on the Cancel button to remove the dialog box.
3.19.1 Summary of Attributes Menu
Table 3-5 explains each menu item on the Attributes menu.
Table 3-5 Attributes Menu Items
| Use This Item |
To |
|
Font ...
|
Change text fonts.
|
|
Text Foreground ...¹
|
Modify text character attributes, such as text color, density, and
degree of transparency.
|
|
Text Background ...¹
|
Modify text background attributes, such as background color, density,
and degree of transparency.
|
|
Object Outline ...¹
|
Modify the attributes for the outlines of objects, such as outline
color, density, and degree of transparency.
|
|
Object Interior ...¹
|
Modify the attributes for the interior of objects, such as interior
color, density, and degree of transparency.
|
|
Page ...¹
|
Modify page background attributes, such as page color, density, and
degree of transparency.
|
¹These five menu items call the same dialog box with slight
changes relevant to the specific attribute.
For more information on the Text Foreground ..., Text Background ...,
and Page ... menu items, see the online help.