DECdocument
Graphics Editor User's Guide
for Motif
2.9.5 Add Labels
If you do not have space to enter the labels, move the drawing as
follows:
- Choose Move from the Control Panel.
- Choose Select All from the Edit menu on the Drawing window.
- Click MB2 to confirm the selection. Move the pointer to reposition
the entire drawing.
- Click MB2 to finish the movement.
To add the labels:
- Move the pointer to the left of the screen and type the label,
Screen.
If desired, use any Ctrl/arrow key function to move the
label in the direction of the arrow.
- Click MB2.
- Repeat steps 1 and 2 to add labels for the Keyboard and System Box.
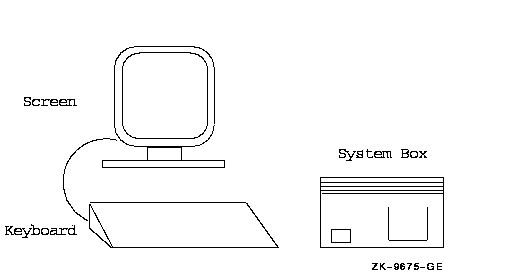
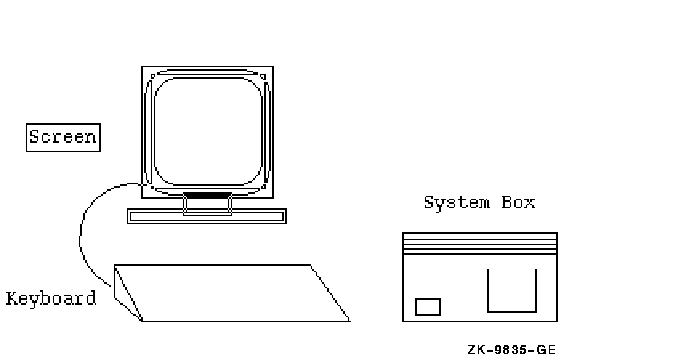
The workstation drawing should look similar to this:
Note
Do not delete this drawing. You will continue to use it in Chapter 3 to
learn how to edit a graphic using the Graphics Editor.
|
Chapter 3
Editing Graphics
3.1 Mirror
This chapter explains how to:
The excercises in this chapter are based on the workstation graphic
that you created in Chapter 2. Follow those procedures to create the
workstation graphic if you have not already done so.
3.2 Editing Options
This chapter explains how to edit graphics and text. It includes
exercises that show how to edit the graphic you created in
Chapter 2.
The Control Panel window contains most of the editing options. See
Figure 3-1. See Figure 1-4 for a complete view of the Control Panel.
Figure 3-1 Editing Options

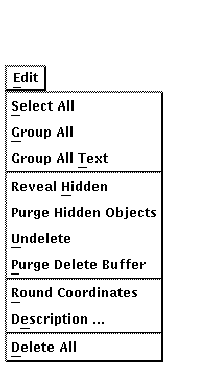
Additional editing options for multiple objects are listed on the Edit
menu. See Figure 3-2. See Figure 1-3 for a complete view of all
menus.
Figure 3-2 Edit Menu
3.3 Selecting Objects and Text
To edit a graphic, you must first select the object to edit. The
following exercises demonstrate how to select objects.
Try these exercises to compare the five ways of selecting objects and
text.
To use object selection to select the keyboard:
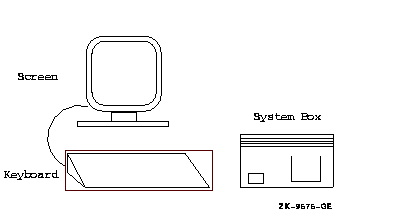
- Position the pointer on any line of the keyboard and click MB1. An
extent rectangle appears around the keyboard as follows:
Figure 3-3 Align Options Popups
You can now edit the keyboard using the option highlighted in the
Control Panel window. Be sure that the edititing option highlighted is
the one you want to use.
- Click MB3 to cancel the selection.
If you accidentally click
MB2, the editing operation that is highlighted will take effect; click
MB3 to cancel the operation or the selection of an object.
To use extended select to select the three labels:
- Hold down the Shift key.
- Click MB1 on the Screen label, the Keyboard label, and the System
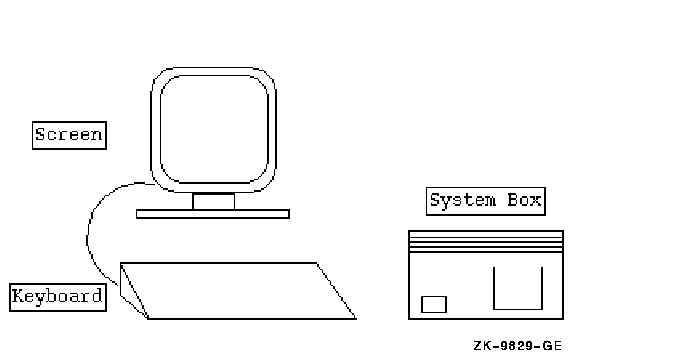
Box label. Do not release the Shift key. An extent rectangle appears
around each label as follows:
- Point to the Keyboard label and click MB1. The Keyboard label is
no longer selected.
- Release the Shift key.
- Click MB3 to cancel the other selections.
To use drag selection to select the screen, stand, and label:
- Position the pointer at one corner of the area that includes the
screen, stand, and label.
- Hold down MB1 and drag the pointer to the opposite corner, creating
a rectangle, and then release MB1. Objects entirely within the
rectangle are selected as shown here:
- Click MB3 to cancel the selection.
To use Select All to select the entire graphic:
- Choose Move from the Control Panel.
- Choose Select All from the Edit menu. Extent rectangles appear
around objects in the entire drawing as follows:

- Click MB2.
- Move the pointer to move the drawing.
- Click MB2 to fix the drawing in place.
To use the Select key to reselect the last object that you selected and
edited:
- Press the Select key.
The entire drawing is reselected.
- Click MB3 to cancel the selection.
3.3.1 Summary of Object Selection
Table 3-1 summarizes the types of object selection.
Table 3-1 Object Selection Methods
| Selection Type |
Number of Objects Selected |
Description |
|
Object select
|
One
|
Move the pointer to the object you want to select and click MB1. If the
correct object is not selected, move the pointer and click MB1 again.
|
|
Extended select
|
More than one
|
Hold down the Shift key, move the pointer to the object you want to
select and click MB1. Continue pointing and clicking MB1 on objects
until all objects are selected. Click MB1 to deselect any object.
Release the Shift key.
|
|
Drag selection
|
One or more
|
Move the pointer outside the object or objects to be selected. Hold
down MB1, draw a rectangle around the objects, and then release MB1.
Use the arrow keys to position the rectangle before releasing MB1 if
necessary.
|
|
Select All
|
All objects and text in the window
|
Choose the Select All menu item on the Edit menu.
|
|
Reselect last
|
One or more
|
Press the Select key. The object you previously selected and edited is
reselected.
|
3.4 Deleting Objects and Text
The following exercises demonstrate the delete and undelete options.
To delete and undelete objects from your workstation drawing:
- Choose Delete from the Control Panel.
- Select the label for the system box as shown here:
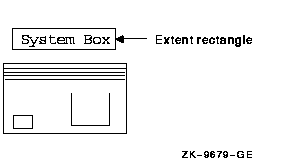
- Click MB2. The label is deleted.
- Select the outside rectangle of the screen and click MB2.
To undelete objects you have deleted:
- Choose Undelete from the Edit menu. The last item you deleted is
recovered.
- Continue to choose Undelete until you recover all the items you
need.
3.4.1 Summary of Deleting and Undeleting
Table 3-2 summarizes the methods of deleting and undeleting objects.
Table 3-2 Deleting and Undeleting Objects
| Selection |
Description |
|
Delete option on the Control Panel
|
Delete individual or groups of objects or text.
|
|
Undelete menu item on the Edit menu
|
Recover objects and text you have deleted.
|
|
Delete All menu item on the Edit menu
|
Delete all visible objects and text in the drawing window.
|
|
Purge Delete Buffer menu item on the Edit menu
|
Clear the delete buffer that stores all objects or text deleted during
the session. Once you clear the delete buffer, you cannot undo the
operation and the Undelete menu item will not redisplay those objects
or text. The delete buffer can use considerable memory space if
numerous deletions are performed. Use this menu item to restore memory
space.
|
|
Remove key
|
Delete one selected object at a time.
|
|
Insert key
|
Replaces the last selected object deleted by the Remove key.
|
3.4.2 Summary of Mouse Buttons and Keys Used for Editing
When editing, you use the mouse buttons and keys similar to the way
they were used during creation. Table 3-3 summarizes the use of the
mouse buttons and keys during editing.
Table 3-3 Mouse Buttons and Keys Used for Editing
| Use: |
To: |
|
MB1
|
Select the editing option and object to be edited.
|
|
MB2
|
Start and finish the editing operation.
|
|
MB3
|
Cancel the editing process and return the object to its original
position.
|
|
Ctrl/x or Do x, x
|
Select the editing option using keystrokes rather than the mouse.
|
|
Shift MB1
|
Select more than one object for editing.
|
|
Return
|
Finish the editing operation. Use when slight movements of the object
must be avoided.
|
|
Select
|
Reselect the last object that was edited.
|
|
Arrow keys
|
Move an object one pixel at a time in the direction of the arrow during
an editing operation, or select the last object that was edited and
move it in the direction of the arrow.
|
These are general editing functions. See the Hints window or the
context-sensitive help for information on the use of each mouse button
while using the Graphics Editor.
3.5 Grouping and Ungrouping Objects and Text
When you create objects with the Graphics Editor, each object is treated
separately unless you group one or more objects together. By grouping
objects together, you can edit several objects with one operation. For
example, when you created the system box, you created seven separate
objects (two rectangles, four lines, and one polyline). You can edit
the system box as one object if you group the seven objects.
The following exercises show how to group objects and text.
To group objects using drag selection:
- Choose the Group option on the Control Panel.
- Drag select the system box.
- Click MB2. The system box and all objects inside it are joined
together.
To group objects using extended object selection:
- Hold down the Shift key.
- Point select the inside screen outline, and then select the
outside screen outline.
- Click MB2 to confirm. The two screen outlines are joined together.
To ungroup the two screen outlines:
- Choose the Ungroup option on the Control Panel.
- Point select the screen outlines.
- Click MB2 to confirm. The screen outlines are separated.
3.5.1 Summary of Grouping and Ungrouping
Table 3-4 summarizes the methods of grouping and ungrouping objects
and text.
Table 3-4 Grouping and Ungrouping Objects and Text
| Selection |
Description |
|
Group option on the Control Panel
|
Group two or more objects or text or join together groups to form more
complex groups. The grouping is kept until you separate the objects
with the Ungroup option.
|
|
Drag Selection
|
Temporarily group objects and text in the window so you can perform one
editing operation on the group.
|
|
Select All menu item on the Edit menu
|
Temporarily group all visible objects and text in the window so you can
perform one editing operation on the group.
|
|
Select key
|
Reselect the last edited object.
|
|
Group All menu item on the Edit menu
|
Group all visible objects and text together and keep as one group until
you separate them with the Ungroup option.
|
|
Group All Text menu item on the Edit menu
|
Group all visible text together and keep as one group until you
separate them with the Ungroup option.
|
|
Ungroup option on the Control Panel
|
Separate any objects and text you have grouped.
|
3.6 Horizontal and Vertical Editing Constraints
You can use Horizontal and Vertical constraints during editing to
restrict object movement to a horizontal or vertical axis, or to a
diagonal line 45 degrees from the horizontal axis.
Editing constraints are set in the same way as creation constraints,
doing either of the following:
- Choose the horizontal or Vertical constraint indicator, or both,
on the Control Panel before starting the editing operation.
- Press the Shift key during the editing operation to set a temporary
constraint.
You can use Horizontal and Vertical constraints with the following
editing options:
- Copy
- Copy/Mirror
- Mirror
- Move
- Scale
When you use constraints with these options, they restrict movement of
the object during the editing operation. For example, if the Horizontal
constraint is on during a Move operation, you can only move the object
in a horizontal direction.
3.7 Moving Objects and Text
The Move option on the Control Panel lets you reposition an object or
text somewhere else on the drawing window.
To move the system box:
- Choose Move from the Control Panel.
- Select the system box.
- Click MB2 and drag the box to a new location.
- Click MB2 to place the box in the new location.
To use a constraint to restrict the movement:
- Turn on the Horizontal constraint indicator.
- Select the system box.
- Click MB2. Note that you can only move the box in a horizontal
direction.
- Click MB3 to cancel the movement. The system box returns to where
it started.
- Turn off the Horizontal constraint indicator.
3.8 Rotating an Object
The Rotate option on the Control Panel lets you rotate an object (text
cannot be rotated).
You use the Rotate Angle and Clockwise settings on the Control Panel to
set the degree and direction of rotation as follows:
- If the Clockwise button is on, the selected objects rotate
clockwise by the angle indicated in the Rotate Angle setting.
- If the Clockwise button is off, the selected objects rotate
counterclockwise by the angle indicated in the Rotate Angle setting.
Rotation is a cumulative operation based on the object's current
position. For example, if you rotate an object 45 degrees and then
rotate it again 45 degrees, the object rotates a total of 90 degrees.
To rotate the system box:
- Choose Rotate from the Control Panel. Verify that the Rotate Angle
setting is 90.0 and the Clockwise setting is on.
- Select the system box.
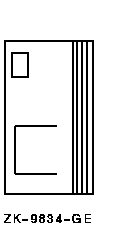
- Click MB2. The box rotates clockwise 90 degrees and is in animation
as shown here. (You can move objects in animation within the Drawing
window.)
Figure 3-4 Align Options Popups
- Position the box and click MB2 to confirm the rotation.
- Turn off the Clockwise setting.
- Change the Rotate Angle setting to 45.
- Select the system box.
- Click MB2. The box now rotates counterclockwise. Click MB2 to
confirm the rotation.
- Rotate the system box once again to return it to its original
orientation.
3.9 Aligning Objects and Text
The Align option on the Control Panel lets you reposition objects in
relation to one another. When aligning objects, the first object you
select is aligned to the second object. You move the first object to
align with the second object. The position of the second object does
not change.
By using the Align icons on the bottom of the Control Panel, you choose
the object alignment you want. In the following figure, the column on
the left refers to the object you move and the area of it you want to
align to the stationary object. The column on the right refers to the
stationary object and the area of it to which you align the moving
object.

To use the Align option to align the system box with the keyboard:
- Choose Align from the Control Panel.
- Set the Align settings as shown here:

- Select the system box (the object that will move).
- Click MB2 to confirm. The extent rectangles are removed.
- Select the keyboard (the object that will remain stationary).
- Click MB2 to confirm. The bottom of the system box is aligned with
the bottom of the keyboard.
If the system box is on top of the keyboard, move it using the Move
option and setting the Horizontal constraint.
3.9.1 Summary of the Align Operation
Ths following is a summary of the Align option:
- Choose the Align settings from the Control Panel or turn on the
Align button.
- Select the object to be repositioned (moving object), and click
MB2.
If you are going to use the object for subsequent alignment
operations, click MB2 twice and omit step 3. By doing this, you will
not have to reselect the object for each subsequent alignment operation.
- Select the reference object (stationary object), and click MB2.
3.10 Copying Objects and Text
The Copy option on the Control Panel lets you make one or more copies
of a selected object and place them where desired.
The Horizontal and Vertical constraint settings limit the movement
following the copy operation to a horizontal or vertical direction. If
you do not set any constraints, you can move the object freely.
To copy the system box:
- Choose Copy from the Control Panel.
- Select the system box.
- Click MB2. A copy of the system box appears.
- Drag the copy to a new location and click MB2 to confirm. Another
copy of the box appears.
- Press the Shift key and drag the second copy to another location.
The movement is now limited to the horizontal or vertical axis. The two
copies must be aligned to change the axis.
- Click MB1 to fix the copy and conclude the copy operation.
To make multiple copies of the Keyboard label:
- Select the Keyboard label.
- Click MB2. A copy of the label appears.
- Move the copy down and slightly to the right.
- Press 3 and Enter. Three copies of the label appear staggered to
the right like the copy you positioned. The labels look similar to the
following:

- Delete the three extra Keyboard labels but keep the copies of the
system box.
3.11 Mirroring an Object
When you mirror an object, the object is flipped either horizontally,
vertically, or in both directions. There are two options on the Control
Panel for mirroring objects (text cannot be mirrored):
| Selection |
Description |
|
Mirror option on the Control Panel
|
Create a mirror image of a selected object and place it where desired.
|
|
Copy/Mirror option on the Control Panel
|
Create a mirror image and copy of the selected object, and place it
where desired.
|
To mirror an object, you should have one or both the Horizontal or
Vertical constraint settings set. If both constraints are set, the
object is mirrored both horizontally and vertically (equivalent to a
180-degree rotation).
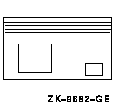
To mirror the system box with the Horizontal constraint set:
- Turn on the Horizontal constraint indicator.
- Choose the Mirror option on the Control Panel.
- Select one of the system box copies.
- Click MB2. The system box is mirrored horizontally.
- Move the box to the desired location and click MB2 to confirm.
To use Copy/Mirror with both constraints set:
- Turn on the Vertical constraint indicator. Both constraints are
set.
- Choose the Copy/Mirror option on the Control Panel.
- Drag select the other copy of the system box.
- Click MB2. A mirror copy of the system box appears. Note that it is
now mirrored both horizontally and vertically.
- Move it to the desired location and click MB2 to confirm. Another
copy appears.
- Click MB3 to conclude the operation and delete the second copy.

- Turn off both the Horizontal and Vertical constraint indicators.


