VMS DECwindows Guide to Xlib (Release 4)
Programming: MIT C Binding
- The client allocates storage for a visual
info data structure and creates a template consisting of the screen
index number and one of the dynamic visual classes specified in the
array usableClasses.
- The GET VISUAL INFO routine checks each
visual on the system for a match of the visual attributes specified in
vInfoTemplate. Each attribute corresponds to a bit set
in the argument vinfo_mask. If a match occurs, the
client continues. If a suitable visual is not found, the client exits.
The GET VISUAL INFO routine has the following format:
XGetVisualInfo(display, vinfo_mask, vinfo_template,
num_items_return)
|
- The client uses a pixmap as a backing store
for the color wheel. When a user reconfigures the color wheel window,
the client copies the color wheel from the pixmap into the resized
window. For information about creating and using pixmaps, see
Chapter 7.
- After creating the pixmap for backing store,
the client creates colors for the wheel and the wheel itself. The
client-defined doCreateColor routine allocates color cells for
the exclusive use of the client and stores initial color values in the
color map.
- The client compares the default visual id
with the visual id in the visual info data structure. If they are
equal, the client allocates colors from the default color map.
Otherwise, the client creates a color map using the visual information
in the visual info data structure. In each case, the client specifies
that only 128 color cells be allocated. After allocating color cells,
the client calls the client-defined doLoadColormap routine to
define color values. For a description of the routine, see callouts 7,
8, 9, and 10.
- The client-defined doCreateWheel
routine defines the wheel used to display colors and specifies initial
color values.
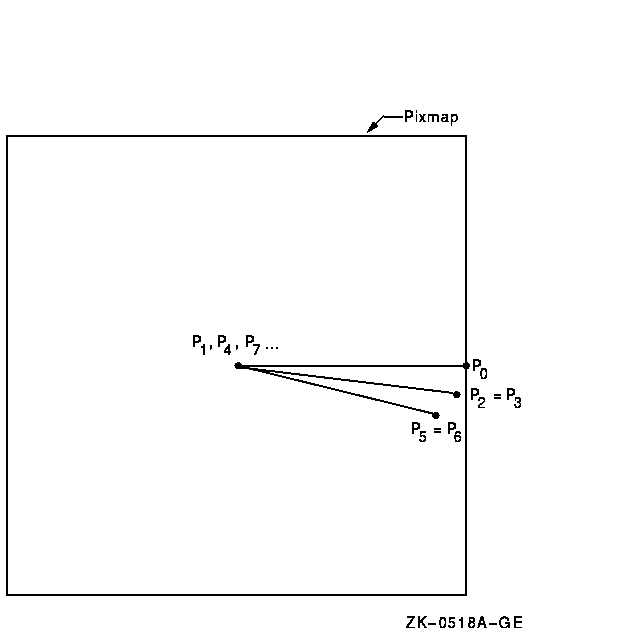
- The wheel is composed of polygons. Each
polygon is defined by three points, one in the center of the wheel and
two at the circumference. After the initial polygon is specified, each
polygon shares one point with the polygon previously defined, as
Figure 5-4 illustrates.
To define each point, the client uses a
point data structure, which is described in Chapter 6. After
defining a polygon, the client fills it with a specified foreground
color.
- When the user reconfigures the window, the
server generates an expose event. In response to the event, the client
copies the pixmap into the exposed area, which is calculated using the
offset from the original to the new position of the window. For
information about handling exposure events, see Chapter 9.
- The client calculates the offset from the
original window position in response to a configure notify event. The
server issues a configure notify event each time the user resizes the
color wheel window. For information about handling configure notify
events, see Chapter 9.
- The rotation of the color wheel is
accomplished by changing values in the color map. As long as there are
no pending events and the user is pressing MB1, the client-defined
doChangeColors routine shifts color values by one.
- The doLoadColormap routine
initializes the color wheel by defining 128 colors and storing them in
the color map.
- Colors are defined initially using the Hue,
Light, Saturation (HLS) system. The values of color hues vary, while
values for light and saturation remain constant. After a color has been
defined using HLS, the color is converted into RGB values by the
client-defined doHLS_to_RGB routine. When all colors are
defined, the client stores them in the color map by calling the STORE
COLORS routine.
Figure 5-4 illustrates how the color wheel in Example 5-4 is
composed of a set of polygons.
Figure 5-4 Polygons That Define the Color Wheel
When allocating colors from any shared color map, the client may
exhaust the resources of the
color map. In this case, Xlib provides a routine for copying the
default color map entries into a new client-created color map.
To create a new color map when the client exhausts the resources of a
previously shared color map, use the COPY COLORMAP AND FREE routine.
The routine creates a color map of the same visual type and for the
same screen as the previously shared color map. The previously shared
color map can be either the default color map or a client-created color
map.
The COPY COLORMAP AND FREE routine has the following format:
XCopyColormapAndFree(display, colormap_id)
|
COPY COLORMAP AND FREE copies all cells allocated by the client from
the previously shared color map to the new color map, keeping color
values intact. The new color map is created with the same value of the
argument alloc as the previously shared color map and
has the following effect on the new color map entries.
Value of Alloc
On Old Color Map |
Effect |
|
AllocAll
|
All entries are copied from the old color map and are then freed
|
|
AllocNone
|
The entries moved are all pixels and planes that have been allocated by
the client using the following routines and that have not been freed
since they were allocated: ALLOC COLOR, ALLOC NAMED COLOR, ALLOC COLOR
CELLS, ALLOC COLOR PLANES
|
5.4.3 Storing Color Values
After allocating color entries in the color map, store RGB values in
the color map cells using the following method:
- Assign color values to the color data structure and set the flags
member to indicate the components to be changed. Normally, all flags
should be set.
- Call the STORE COLOR routine to store one color, the STORE COLORS
routine to store more than one color, and the STORE NAMED COLOR routine
to store a named color.
The STORE COLOR routine has the following format:
XStoreColor(display, colormap_id, screen_def_return)
|
The STORE COLORS routine has the following format:
XStoreColors(display, colormap_id, screen_defs_return,
num_colors)
|
The STORE NAMED COLOR routine has the following format:
XStoreNamedColor(display, colormap_id, color_name,
pixel, flags)
|
Refer to Example 5-4 for an example of using the STORE COLORS routine.
5.5 Freeing Color Resources
To free storage allocated for client colors, call the FREE COLORS
routine. FREE COLORS releases all storage allocated by the following
color routines: ALLOC COLOR, ALLOC COLOR CELLS, ALLOC NAMED COLORS, and
ALLOC COLOR PLANES.
To delete the association between the color map ID and the color map,
use the FREE COLORMAP routine. FREE COLORMAP has no effect on the
default color map of the screen. If the color map is an installed color
map, FREE COLORMAP removes it.
5.6 Querying Color Map Entries
Xlib provides routines to return the RGB values of both the color map
index and a named color.
To query the RGB values of a specified pixel in the color map, use the
QUERY COLOR routine. The pixel value to look up is specified in the
pixel member of the color data structure. The RGB components of the
color value are returned in the red, green, and blue members of the
data structure.
To query the RGB values of an array of pixel values, use the QUERY
COLORS routine. The values returned are the values passed in the pixel
member of the color data structure. Note that if the color map entry
being queried is undefined, the value returned by QUERY COLOR will not
necessarily correspond to the color displayed on the screen.
To look up the values associated with a named color, use the LOOKUP
COLOR routine. LOOKUP COLOR uses the specified color map to find out
the values with respect to a specific screen. It returns both the exact
RGB values and the closest RGB values supported by hardware.
Chapter 6
Drawing Graphics
Xlib provides clients with routines that draw graphics into windows and
pixmaps. This chapter describes how to create and manage graphics drawn
into windows, including the following topics:
- Drawing points, lines, rectangles, and arcs
- Filling rectangles, polygons, and arcs
- Copying graphics
- Limiting graphics to a region of a window or pixmap
- Clearing graphics from a window
- Creating cursors
Chapter 7 describes drawing graphics into pixmaps.
6.1 Graphics Coordinates
Xlib graphics coordinates define the position of graphics drawn in a
window or pixmap. Coordinates are either relative to the origin of the
window or pixmap in which the graphics object is drawn or relative to a
previously drawn graphics object.
Xlib graphics coordinates are similar to the coordinates that define
window position. Xlib measures length along the x-axis from the origin
to the right. Xlib measures length along the y-axis from the origin
down. Xlib specifies coordinates in units of pixels.
6.2 Using Graphics Routines Efficiently
If clients use the same drawable and graphics context for each call,
Xlib handles back-to-back calls of DRAW POINT, DRAW LINE, DRAW SEGMENT,
DRAW RECTANGLE, FILL ARC, and FILL RECTANGLE in a batch. Batching
increases efficiency by reducing the number of requests to the server.
When drawing more than a single point, line, rectangle, or arc, clients
can also increase efficiency by using routines that draw or fill
multiple graphics (DRAW POINTS, DRAW LINES, DRAW SEGMENTS, DRAW
RECTANGLES, DRAW ARCS, FILL ARCS, and FILL RECTANGLES). Clipping
negatively affects efficiency. Consequently, clients should ensure
that graphics they draw to a window or pixmap are within the boundary
of the drawable. Drawing outside the window or pixmap decreases
performance. Clients should also ensure that windows into which they
are drawing graphics are not occluded.
The most efficient method for clearing multiple areas is using the FILL
RECTANGLES routine. By using the FILL RECTANGLES
routine, clients can increase server performance. For information about
using FILL RECTANGLES to clear areas, see Section 6.6.1.
6.3 Drawing Points and Lines
Xlib includes routines that draw points and lines. When clients draw
more than one point or line, performance is affected. Performance is
most efficient if clients use Xlib routines that draw multiple points
or lines rather than calling single point and line-drawing routines
many times.
This section describes using routines that draw both single and
multiple points and lines.
6.3.1 Drawing Points
To draw a single point, use the DRAW POINT routine, specifying x-axis
and y-axis coordinates, as in the following:
                  .
                  .
                  .
    int x,y=100;
    XDrawPoint(display, window, gc, x, y);
|
If drawing more than one point, use the following method:
- Define an array of point data structures.
- Call the DRAW POINTS routine, specifying the array that defines the
points, the number of points the server is to draw, and the coordinate
system the server is to use. The server draws the points in the order
specified by the array.
Xlib includes the point data structure to enable clients to define an
array of points easily. The following illustrates the data structure:
typedef struct {
    short x, y;
} XPoint;
|
Table 6-1 describes the members of the point data structure.
The server determines the location of points according to the following:
- If the client specifies the constant
CoordModeOrigin, the server defines all points in the
array relative to the origin of the drawable.
- If the client specifies the constant
CoordModePrevious, the server defines the coordinates
of the first point in the array relative to the origin of the drawable
and the coordinates of each subsequent point relative to the point
preceding it in the array.
The server refers to the following members of the GC data structure to
define the characteristics of points it draws:
|
Function
|
Plane mask
|
|
Foreground
|
Subwindow mode
|
|
Clip x origin
|
Clip y origin
|
|
Clip mask
|
|
Chapter 4 describes GC data structure members.
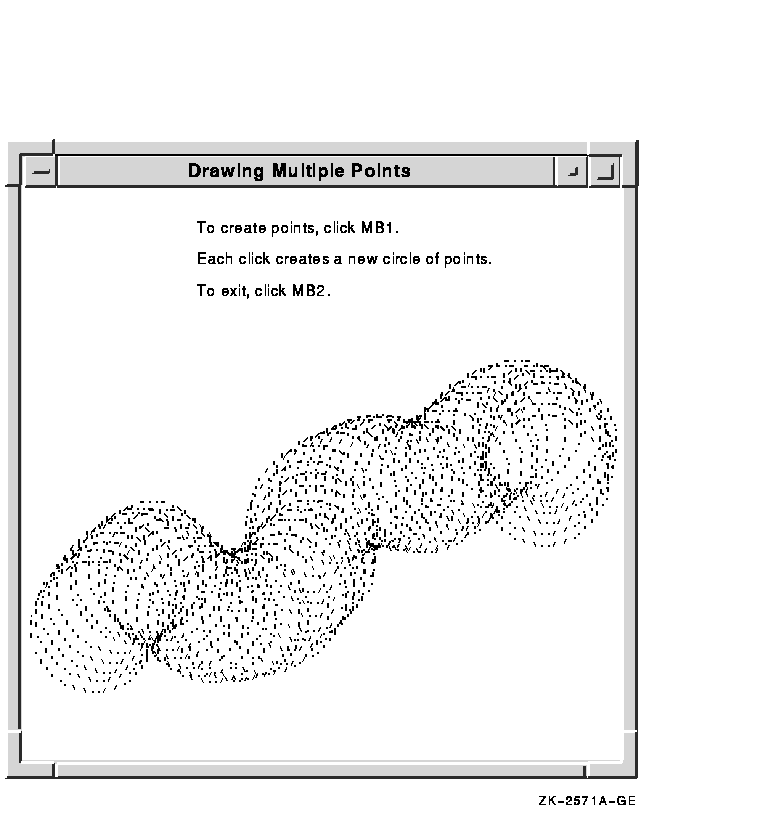
Example 6-1 uses the DRAW POINTS routine to draw a circle of points
each time the user clicks MB1.
Figure 6-1 illustrates sample output from the program.
| Example 6-1 Drawing Multiple Points |
                    .
                    .
                    .
/***** Handle events *****/
static void doHandleEvents( )
{
    XEvent event;

    for ( ; ; ) {
        XNextEvent(dpy, &event);
        switch (event.type) {
            case Expose:                doExpose(&event); break;
            case ButtonPress:           doButtonPress(&event); break;
        }
    }
}

/***** Write a message *****/
(1)static void doExpose(eventP)
XEvent *eventP;
{
    char message1[ ] = {"To create points, click MB1"};
    char message2[ ] = {"Each click creates a new circle of points"};
    char message3[ ] = {"To exit, click MB2"};

    XDrawImageString(dpy, win, gc, 150, 25, message1, strlen(message1));
    XDrawImageString(dpy, win, gc, 150, 50, message2, strlen(message2));
    XDrawImageString(dpy, win, gc, 150, 75, message3, strlen(message3));
}


/***** Draw the points *****/
static void doButtonPress(eventP)
XEvent *eventP;
{
#define POINT_CNT 100
#define RADIUS 50
    XPoint point_arr[POINT_CNT];
    int i;
(2)  int x = eventP->xbutton.x;
    int y = eventP->xbutton.y;

    if (eventP->xbutton.button == Button2) sys$exit (1);

    for (i=0;i<POINT_CNT;i++) {
        point_arr[i].x = x + RADIUS*cos(i);
        point_arr[i].y = y + RADIUS*sin(i);
    }

(3)  XDrawPoints(dpy, win, gc, &point_arr, POINT_CNT, CoordModeOrigin);
}
|
- When the client receives notification that
the server has mapped the window, the doExpose routine writes
three messages into the window. For information about using the DRAW
IMAGE STRING routine, see Chapter 8.
- If the user clicks any mouse button, the
client initiates the doButtonPress routine. If the user clicks
MB1, the client draws 50 points. If the user clicks MB2, the client
exits the system. The client determines which button the user pressed
by referring to the button member of the button event data structure.
For more information about the button event data structure, see
Chapter 9.
- The DRAW POINTS routine has the following
format:
XDrawPoints(display, drawable_id, gc_id, points, num_points,
point_mode)
|
The point_mode argument specifies whether
coordinates are relative to the origin of the drawable or to the
previous point in the array.
Figure 6-1 Circles of Points Created Using the DRAW POINTS
Routine
6.3.2 Drawing Lines and Line Segments
Xlib includes routines that draw single lines, multiple lines, and line
segments. To draw a single line, use the DRAW LINE routine, specifying
beginning and ending points, as in the following:
                    .
                    .
                    .
    int x1,y1=100;
    int x2,y2=200;
    XDrawLine(display, window, gc, x1, y1, x2, y2);
|
To draw multiple lines, use the following method:
- Define an array of points using the point data structure described
in Section 6.3.1 to specify beginning and ending line points. The
server interprets pairs of array elements as beginning and ending
points. For example, if the array that defines the beginning point is
point[i] , the server reads point[i+1] as the corresponding ending
point.
- Call the DRAW LINES routine, specifying the following:
- The array that defines the points.
- The number of points that define the line.
- The coordinate system the server uses to locate the points.
The server draws the lines in the order specified by the array.
Clients can specify either the CoordModeOrigin or the
CoordModePrevious constant to indicate how the server
determines the location of beginning and ending points. The server uses
the methods described in Section 6.3.1.
The server draws lines in the order the client has defined them in the
point data structure. Lines join correctly at all intermediate points.
If the first and last points coincide, the first and last line also
join correctly. For any given line, the server draws pixels only once.
The server draws intersecting pixels multiple times if zero-width lines
intersect; it draws intersecting pixels of wider lines only once.
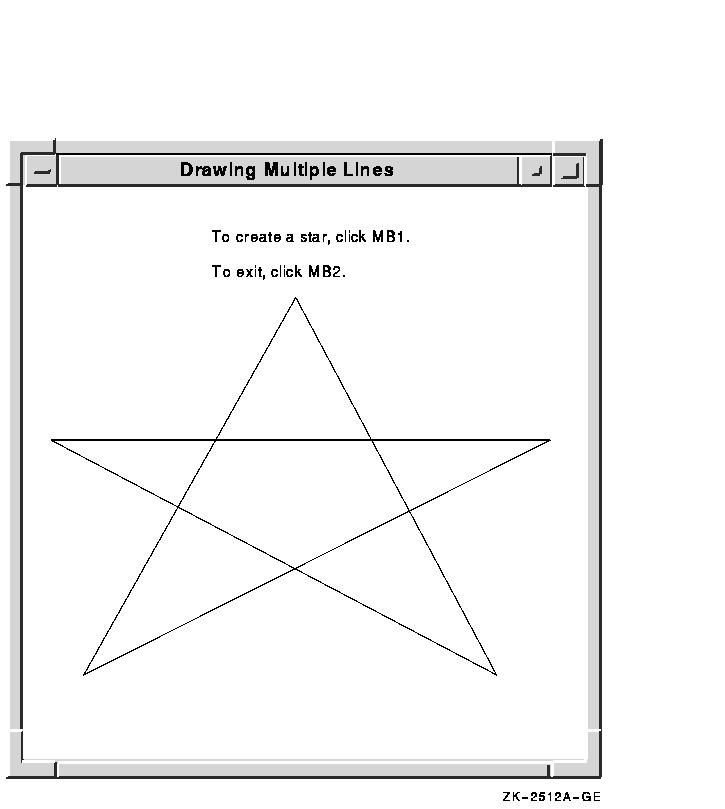
Example 6-2 uses the DRAW LINES routine to draw a star when the
server notifies the client that the window is mapped.
| Example 6-2 Drawing Multiple Lines |
                    .
                    .
                    .
/***** Handle events *****/
static void doHandleEvents( )
{
    XEvent event;

    for ( ; ; ) {
        XNextEvent(dpy, &event);
        switch (event.type) {
            case Expose:                doExpose(&event); break;
        }
    }
}

/***** Expose event *****/
static void doExpose(eventP)
XEvent *eventP;
{
    XPoint pt_arr[6];

(1)  pt_arr[0].x = 75;
    pt_arr[0].y = 500;
    pt_arr[1].x = 300;
    pt_arr[1].y = 100;
    pt_arr[2].x = 525;
    pt_arr[2].y = 500;
    pt_arr[3].x = 50;
    pt_arr[3].y = 225;
    pt_arr[4].x = 575;
    pt_arr[4].y = 225;
    pt_arr[5].x = 75;
    pt_arr[5].y = 500;
(2)   XDrawLines(dpy, win, gc, &pt_arr, 6, CoordModeOrigin);
}
                    .
                    .
                    .
|
- The doExpose routine uses point data
structures to define beginning and ending points of lines.
- The call to draw lines refers to a graphics
context (gc), which the client has previously defined, and an
array of point data structures. The constant
CoordModeOrigin indicates that all points are relative
to the origin of win (100,100).
Figure 6-2 illustrates the resulting output.
Figure 6-2 Star Created Using the DRAW LINES Routine
Use the DRAW SEGMENTS routine to draw multiple, unconnected lines,
defining an array of segments in the segment data structure.
The following illustrates the data structure:
typedef struct {
    short x1, y1, x2, y2;
} XSegment;
|
Table 6-2 describes the members of the data structure.
Table 6-2 Segment Data Structure Members
| Member Name |
Contents |
|
x1
|
The x value of the coordinate that specifies one endpoint of the segment
|
|
y1
|
The y value of the coordinate that specifies one endpoint of the segment
|
|
x2
|
The x value of the coordinate that specifies the other endpoint of the
segment
|
|
y2
|
The y value of the coordinate that specifies the other endpoint of the
segment
|
The DRAW SEGMENTS routine functions like the DRAW LINES routine, except
the routine does not use the coordinate mode.
The DRAW LINE and DRAW SEGMENTS routines refer to all but the join
style, fill rule, arc mode, and font members of the GC data structure
to define the characteristics of lines. The DRAW LINES routine refers
to all but the fill rule, arc mode, and font members of the data
structure.
Chapter 4 describes the GC data structure.