                    .
                    .
                    .
Pixmap pixmap;
int n, exposeflag = 0;
                    .
                    .
                    .
/***** Create the graphics context *****/
static void doCreateGraphicsContext( )
{
    XGCValues xgcv;

    /* Create graphics context. */

(1)  xgcv.foreground = doDefineColor(1);
    xgcv.background = doDefineColor(1);

    gc = XCreateGC(dpy, win, GCForeground | GCBackground, &xgcv);
}

/***** Create the pixmap *****/
static void doCreatePixmap( )
{
    XPoint pt_arr[6];

    pt_arr[0].x = 75;
    pt_arr[0].y = 500;
    pt_arr[1].x = 300;
    pt_arr[1].y = 100;
    pt_arr[2].x = 525;
    pt_arr[2].y = 500;
    pt_arr[3].x = 50;
    pt_arr[3].y = 225;
    pt_arr[4].x = 575;
    pt_arr[4].y = 225;
    pt_arr[5].x = 75;
    pt_arr[5].y = 500;

(2)  pixmap = XCreatePixmap(dpy, win, winW, winH, DefaultDepthOfScreen(screen));
(3)  XFillRectangle(dpy, pixmap, gc, 0, 0, winW, winH);
    XSetForeground(dpy, gc, doDefineColor(2));
(4)  XFillPolygon(dpy, pixmap, gc, &pt_arr, 6, Complex, CoordModeOrigin);
}
                         .
                         .
                         .
/***** Handle events *****/
static void doHandleEvents( )
{
    XEvent event;

    for ( ; ; ) {
        XNextEvent(dpy, &event);
        switch (event.type) {
            case Expose:                doExpose(&event); break;
            case ButtonPress:           doButtonPress(&event); break;
        }
    }
}

/***** Write a message *****/
static void doExpose(eventP)
XEvent *eventP;
{
    char message1[ ] = {"To create a filled polygon, click MB1."};
    char message2[ ] = {"To exit, click MB2."};

    XDrawImageString(dpy, win, gc, 150, 25, message1, strlen(message1));
    XDrawImageString(dpy, win, gc, 150, 50, message2, strlen(message2));
(5)  if (!exposeflag)
        exposeflag = 1;
    else
        XCopyArea(dpy, pixmap, win, gc, 0, 0, winW, winH, 0, 0);
        XDrawImageString(dpy, win, gc, 150, 50, message2, strlen(message2));
}


/***** Draw the polygon in the window *****/
static void doButtonPress(eventP)
XEvent *eventP;
{
    char message2[ ] = {"To exit, click MB2."};

    if (eventP->xbutton.button == Button2) sys$exit (1);

    XCopyArea(dpy, pixmap, win, gc, 0, 0, winW, winH, 0, 0);
    XDrawImageString(dpy, win, gc, 150, 50, message2, strlen(message2));
}
|
- Pixmaps use only the foreground member of the graphics context to define color. Because the client is using the pixmap as backing store, which is copied into the window to repaint exposed areas, both foreground and background members of the graphics context are first defined as the window background color.
- The pixmap has the width, height, and depth of the window.
- FILL RECTANGLE fills the pixmap with the background color of the window. After filling the pixmap to ensure that pixel values of both the pixmap and window background are the same, the foreground color is redefined for graphics operations.
- After redefining foreground color, the client draws the polygon into the pixmap. For description of specifying and filling the polygon, see Example 6-5.
- At the first window exposure, the client draws only the text into the window. On subsequent exposures, the client copies the pixmap into the window to repaint exposed areas. For a description of handling exposure events, see Chapter 9.
Note that the CREATE PIXMAP routine is not a synchronous routine and does not return an error if the routine fails to create a pixmap. Although Xlib returns a resource ID for this routine, it does not indicate that a valid resource was created by the server. Refer to Section 9.13.3 for a method to check if a pixmap, or any X resource, has been created.
When a client no longer needs a pixmap, use the FREE PIXMAP routine to
free storage associated with it. FREE PIXMAP first deletes the
association between the pixmap identifier and the pixmap and then frees
pixmap storage.
7.2 Creating and Managing Bitmaps
Xlib enables clients to create files of bitmap data and then to use those files to create either bitmaps or pixmaps. To create a bitmap data file, use the WRITE BITMAP FILE routine. Example 7-2 illustrates creating a pixmap and writing the pixmap data into a bitmap data file.
| Example 7-2 Creating a Bitmap Data File |
|---|
                    .
                    .
                    .
/***** Create the pixmap *****/
static void doCreatePixmap( )
{
    XPoint pt_arr[5];

    pt_arr[0].x = 20;
    pt_arr[0].y = 0;
    pt_arr[1].x = 20;
    pt_arr[1].y = 5;
    pt_arr[2].x = 20;
    pt_arr[2].y = 10;
    pt_arr[3].x = 20;
    pt_arr[3].y = 15;
    pt_arr[4].x = 20;
    pt_arr[4].y = 20;

    pixmap = XCreatePixmap(dpy, win, pixW, pixH, DefaultDepthOfScreen(screen));
    XFillRectangle(dpy, pixmap, gc, 0, 0, pixW, pixH);
    XSetForeground(dpy, gc, doDefineColor(2));
    XDrawLines(dpy, pixmap, gc, &pt_arr, 5, CoordModeOrigin);
    status = XWriteBitmapFile(dpy, "bitfile.dat", pixmap, 20, 20, 0, 0);
}
|
The client first creates a pixmap using the method described in Section 7.1 and then calls the WRITE BITMAP FILE routine to write the pixmap data into the BITFILE.DAT bitmap file.
To create a bitmap or pixmap from a bitmap data file, use either the CREATE BITMAP FROM DATA or CREATE PIXMAP FROM DATA routine. Example 7-3 illustrates creating a pixmap from the bitmap data stored in BITFILE.DAT.
| Example 7-3 Creating a Pixmap from Bitmap Data |
|---|
                         .
                         .
                         .
/***** Create the pixmap *****/
static void doCreatePixmap( )
{
   static char LINES[] = {
      0x00, 0x00, 0x00, 0x00, 0x00, 0x00, 0x00, 0x00, 0x00, 0x3f, 0x06, 0x00,
      0x03, 0x0c, 0x00, 0x03, 0x18, 0x02, 0x03, 0x30, 0x00, 0xf3, 0x7f, 0x05,
      0x03, 0x30, 0x00, 0x03, 0x18, 0x00, 0x03, 0x0c, 0x00, 0x3f, 0x06, 0x00,
      0x00, 0x00, 0x05, 0x00, 0x00, 0x00, 0x00, 0x00, 0x04, 0x00, 0x00, 0x00,
      0xaa, 0xaa, 0x0a, 0x55, 0x55, 0x05, 0xaa, 0xaa, 0x0a, 0x55, 0x55, 0x05};

    pixmap = XCreatePixmapFromBitmapData(dpy, win, LINES, pixW, pixH,
        xgcv.foreground, xgcv.background, XDefaultDepthOfScreen(screen));
    XSetWindowBackgroundPixmap(dpy, win, pixmap);
}
                         .
                         .
                         .
|
The client uses the pixmap to define window background.
7.3 Working with Images
Instead of managing images directly, clients perform operations on them by using the image data structure, which includes a pointer to data such as the LINES array defined in Example 7-3. In addition to the image data, the image data structure includes pointers to client-defined functions that perform the following operations:
- Destroying an image
- Getting a pixel from the image
- Storing a pixel in the image
- Extracting part of the image
- Adding a constant to the image
If the client has not defined a function, the corresponding Xlib routine is called by default.
The following illustrates the data structure:
typedef struct _XImage {
    int width, height;
    int xoffset;
    int format;
    char *data;
    int byte_order;
    int bitmap_unit;
    int bitmap_bit_order;
    int bitmap_pad;
    int depth;
    int bytes_per_line;
    int bits_per_pixel;
    unsigned long red_mask;
    unsigned long green_mask;
    unsigned long blue_mask;
    char *obdata;
    struct funcs {
        struct _XImage *(*create_image)();
        int (*destroy_image)();
        unsigned long (*get_pixel)();
        int (*put_pixel)();
        struct _XImage *(*sub_image)();
        int (*add_pixel)();
        } f;
} XImage;
|
Table 7-1 describes the members of the data structure.
| Member Name | Contents | ||||||||
|---|---|---|---|---|---|---|---|---|---|
| width | Specifies the width of the image. | ||||||||
| height | Specifies the height of the image. | ||||||||
| offset | Specifies the number of pixels offset in the x direction. Specifying an offset permits the server to ignore the beginning of scanlines and rapidly display images when Z pixmap format is used. | ||||||||
| format |
Specifies whether the data is stored in XY pixmap or Z pixmap format.
The following flags facilitate specifying data format:
|
||||||||
| data | Indicates the address of the image data. | ||||||||
| byte_order | Indicates whether the least significant or the most significant byte is first. | ||||||||
| bitmap_unit | Specifies whether the bitmap is organized in units of 8-, 16-, or 32-bits. | ||||||||
| bitmap_bit_order | Specifies whether the bitmap order is least or most significant. | ||||||||
| bitmap_pad | Specifies whether padding in XY format or Z format should be done in units of 8-, 16-, or 32-bits. | ||||||||
| depth | Specifies the depth of the image. | ||||||||
| bytes_per_line | Specifies the bytes per line to be used as an accelerator. | ||||||||
| bits_per_pixel | Indicates for Z format the number of bits per pixel. | ||||||||
| red_mask | Specifies red values for Z format. | ||||||||
| green_mask | Specifies green values for Z format. | ||||||||
| blue_mask | Specifies blue values for Z format. | ||||||||
| obdata | Specifies the address of a data structure that contains object routines. | ||||||||
| create_image | Specifies a client-defined function that creates an image. | ||||||||
| destroy_image | Specifies a client-defined function that destroys an image. | ||||||||
| get_pixel | Specifies a client-defined function that gets the value of a pixel in the image. | ||||||||
| put_pixel | Specifies a client-defined function that changes the value of a pixel in the image. | ||||||||
| sub_image | Specifies a client-defined function that creates a new image from an existing one. | ||||||||
| add_pixel | Specifies a client-defined function that increments the value of each pixel in the image by a constant. |
To create an image, use either the CREATE IMAGE or the GET IMAGE routine. CREATE IMAGE initializes an image data structure, including a reference to the image data. For example, the following call creates an image data structure that points to the image data LINES, illustrated in Example 7-3:
#define pixW 16
#define pixH 16
#define bitmap_pad 16
#define bytes_per_line 16

XImage *image;
                         .
                         .
                         .
     image = XCreateImage(dpy, XDefaultVisualOfScreen(screen),
          XDefaultDepthOfScreen(screen), ZPixmap, 0, &LINES,
          pixW, pixH, bitmap_pad, bytes_per_line);
                         .
                         .
                         .
|
Note that the CREATE IMAGE routine does not allocate storage space for the image data.
To create an image from a drawable, use the GET IMAGE routine. In the following example, the client creates an image from a pixmap:
#define xOrigin 0
#define yOrigin 0
#define pixW 16
#define pixH 16
                       .
                       .
                       .
    image = XGetImage(dpy, pixmap, xOrigin, yOrigin, pixW,
         pixH, AllPlanes, ZPixmap);
                       .
                       .
                       .
|
When the client calls the GET IMAGE routine and the drawable is a window, the window must be mapped. In addition, if there are no inferiors or overlapping windows, the specified rectangle of the window should be fully visible on the screen and wholly contained within the outside edges of the window. In other words, an error results if the GET IMAGE routine is called to get a portion of a window that is off-screen.
To transfer an image from memory to a drawable, use the PUT IMAGE routine. In the following example, the client transfers the image from memory to a window:
#define pixW 16
#define pixH 16
#define srcX 0
#define srcY 0
#define dstX 200
#define dstY 200
                         .
                         .
                         .
    XPutImage(dpy, win, gc, image, srcX, srcY, dstX, dstY,
        pixW, pixH);
                         .
                         .
                         .
|
The call transfers the entire image, which was created in the call to GET IMAGE, from memory to coordinates (200, 200) in the window.
As the description of the image data structure indicates, Xlib enables clients to store an image in the following ways:
- As a bitmap---XY bitmap format stores the image as a two-dimensional array. Figure 7-1 illustrates XY bitmap format.
- As a set of bitmaps---XY pixmap format stores the image as a stack of bitmaps. Figure 7-2 illustrates XY pixmap format.
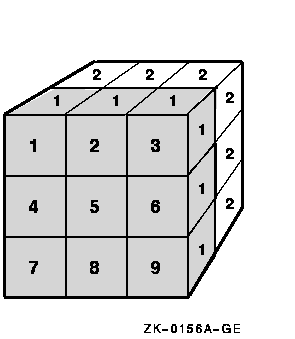
- As a list of pixel values---Z pixmap format stores the image as a list of pixel values viewed as a horizontal row. Each example of creating an image uses Z pixmap format. Figure 7-3 illustrates scanline order.
Figure 7-1 XY Bitmap Format
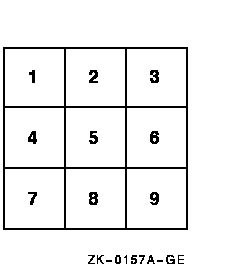
Figure 7-2 XY Pixmap Format
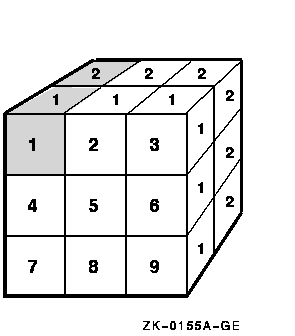
Figure 7-3 Z Format
Xlib includes routines to change images by manipulating their pixel values and creating new images out of subsections of existing images. Table 7-2 lists these routines and their use. Clients can override these routines by defining functions referred to in the image data structure.
| Routine | Description |
|---|---|
| ADD PIXEL | Increments each pixel in an image by a constant value |
| GET PIXEL | Returns the pixel value of an image |
| PUT PIXEL | Sets the pixel value of an image |
| SUB IMAGE | Creates a new image out of a subsection of an existing image |
When a client no longer needs an image, use the DESTROY IMAGE routine to deallocate memory associated with the image data structure.
| Previous | Next | Contents | Index |