![[Compaq]](../../images/compaq.gif)
![[Go to the documentation home page]](../../images/buttons/bn_site_home.gif)
![[How to order documentation]](../../images/buttons/bn_order_docs.gif)
![[Help on this site]](../../images/buttons/bn_site_help.gif)
![[How to contact us]](../../images/buttons/bn_comments.gif)
![[OpenVMS documentation]](../../images/ovmsdoc_sec_head.gif)
| Document revision date: 30 March 2001 | |
|
|
|
|
|
|
| Previous | Contents | Index |
You can use this fix to adjust the lock queue limit of a process. When you select the Lock option, the Availability Manager displays the page shown in Figure 5-15.
Figure 5-15 Lock Queue Limit Page
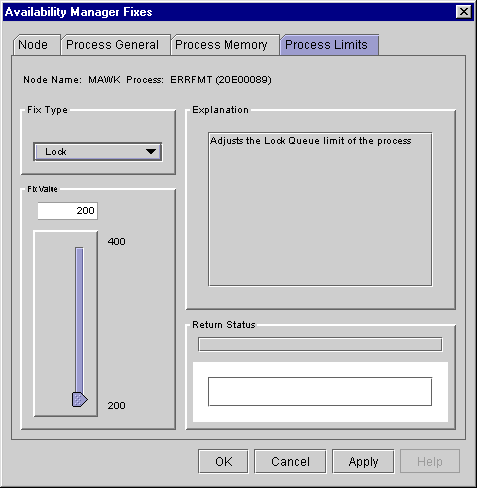
To perform this fix, use the slider to adjust the lock queue limit to the number you want. You can also click the line above or below the slider to adjust the number by one.
When you are satisfied with the new lock queue limit, select one of the options displayed at the bottom of the page. A message displayed on the page indicates that the fix has been successful.
5.2.5.6 Time Queue Entry Limit
You can use this fix to adjust the time queue entry limit of a process.
When you select the Timer option, the Availability Manager displays the page
shown in Figure 5-16.
Figure 5-16 Time Queue Entry Limit Page
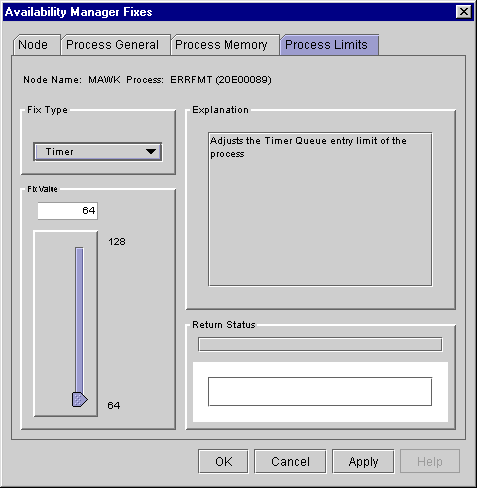
To perform this fix, use the slider to adjust the timer queue entry limit to the number you want. You can also click the line above or below the slider to adjust the number by one.
When you are satisfied with the new timer queue entry limit, select one of the options displayed at the bottom of the page. A message displayed on the page indicates that the fix has been successful.
5.2.5.7 Subprocess Creation Limit
You can use this fix to adjust the creation limit of the subprocess of
a process. When you select the Subprocess option, the Availability Manager
displays the page shown in Figure 5-17.
Figure 5-17 Subprocess Creation Limit Page
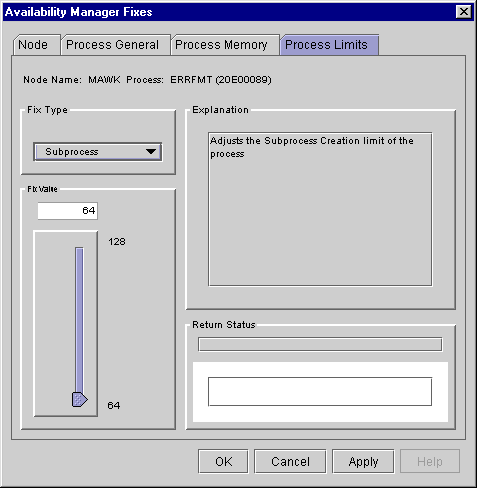
To perform this fix, use the slider to adjust a process's subprocess creation limit to the number you want. You can also click the line above or below the slider to adjust the number by one.
When you are satisfied with the new subprocess creation limit, select one of the options displayed at the bottom of the page. A message displayed on the page indicates that the fix has been successful.
5.2.5.8 I/O Byte
You can use this fix to adjust the I/O byte limit of a process. When
you select the I/O Byte option, the Availability Manager displays the page
shown in Figure 5-18.
Figure 5-18 I/O Byte Page
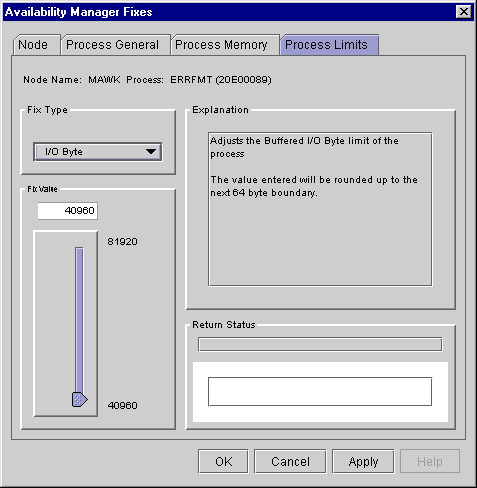
To perform this fix, use the slider to adjust the I/O byte limit to the number you want. You can also click the line above or below the slider to adjust the number by one.
When you are satisfied with the new I/O byte limit, select one of the options displayed at the bottom of the page. A message displayed on the page indicates that the fix has been successful.
This chapter explains how to customize the following features of the Availability Manager:
| Feature | Description |
|---|---|
| Nodes or groups of nodes | You can select one or more groups or individual nodes to monitor. |
| Group membership | You can change a node's default group membership. |
| Types of data collection | For OpenVMS nodes, you can select the types of data you want to collect as well as several types of collection intervals. (On Windows NT nodes, specific types of data are collected by default.) |
| Data filters | For OpenVMS nodes, you can specify a number of parameters and values that limit the amount of data that is collected. |
| Event filters | You can specify the severity of events that are displayed as well as several other filtering settings. |
| Security features | On Data Analyzer and Data Collector nodes, you can change passwords. On OpenVMS Data Collector nodes, you can edit a file that contains security triplets. |
How to Specify Which Nodes to Customize
In the Application window, you can select the Customize option in either of these places:
Figure 6-1 Customize Menu in Application Window
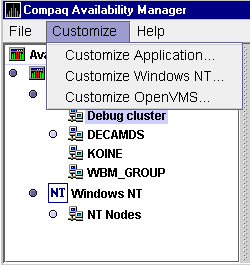
Figure 6-2 Customize Menu in Node Pane
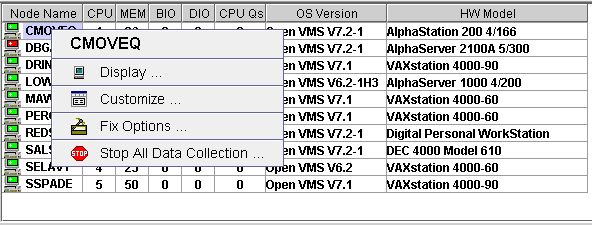
Depending on which Customize menu you use and your choice of menu items, your customizations can affect one or more nodes, as indicated in the following table.
| Nodes Affected | Action |
|---|---|
| All nodes | Click Customize Application... on the menu shown in Figure 6-1. |
| All Windows NT nodes | Click Customize Windows NT... on the menu shown in Figure 6-1. |
| All OpenVMS nodes | Click Customize OpenVMS... on the menu shown in Figure 6-1. |
| One node | Click Customize... on the popup menu shown in Figure 6-2. The customization options you choose will affect only the node you have selected. |
When you select Customize Application on the Application window Customize menu (Figure 6-1), the Availability Manager displays a Group/Node Lists tab (Figure 6-3).
Figure 6-3 Group/Node Lists Customization Page
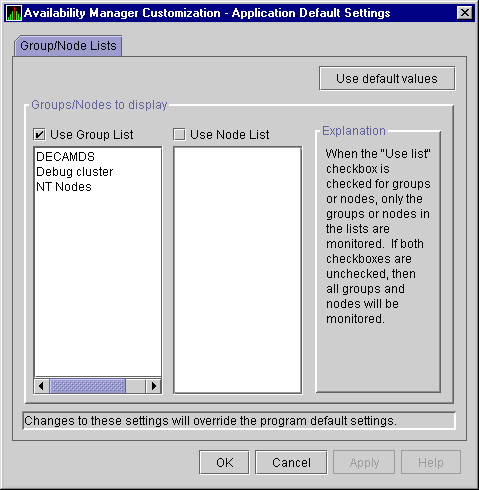
You can select either of the following lists of nodes to monitor:
If you decide to return to the default (monitor all nodes) or to enter names again, click Use default values.
After you enter a list of groups or individual nodes, click one of the following choices:
| Option | Description |
|---|---|
| OK | Accepts the choice of names you have entered and exits the page. |
| Cancel | Cancels the choice of names and does not exit the page. |
| Apply | Accepts the choice of names you have entered but does not exit the page. |
To put the list into effect, exit the Availability Manager and restart
it.
6.2 Changing the Group Membership of a Node
Each Availability Manager Data Collector node is assigned to the DECAMDS group by default. The following sections explain how to change the group membership of nodes.
You need to place nodes that are in a cluster in the same group. If nodes within a cluser are in different groups, some of the data collected might be misleading. |
You need to edit a logical on each Data Collector node to change the group for that node. To do this, follow these steps:
$ AMDS$DEF AMDS$GROUP_NAME FINANCE ! Group FINANCE; OpenVMS Cluster alias |
$ @SYS$STARTUP:AMDS$AM_STARTUP RESTART |
The configuration files for DECamds and the Availability Manager are separate; only one set is used, depending on which startup command procedure you use to start the driver. Refer to the Compaq Availability Manager Version 1.4 Installation Instructions for OpenVMS Alpha Systems for further explanation of the configuration files set up for both DECamds and the Availability Manager. |
You need to edit the Registry to change the group of a Windows NT node. To edit the Registry, follow these steps:
Before you start this section, be sure to read the explanation of data collection, events, thresholds, and occurrences in Chapter 1. |
When you click the Customize OpenVMS... menu option in the Application window and then click the Data Collection tab, the Availability Manager displays the OpenVMS Data Collection page, where you can choose types of data you want to collect. You can also change the default Availability Manager intervals at which data is collected or updated.
Figure 6-4 shows the OpenVMS Data Collection page.
Figure 6-4 OpenVMS Data Collection Page
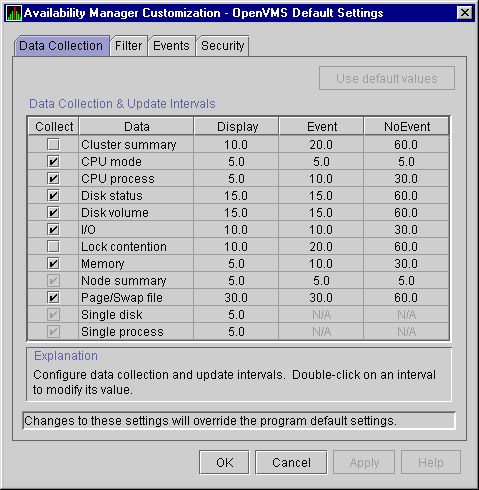
Table 6-1 identifies the page where each type of data collected appears and indicates whether or not that type of data collection is a default.
| Type of Data Collection | Default | Page That Data Is Collected For |
|---|---|---|
| Cluster summary data | No | Cluster Summary page |
| CPU mode data | No | CPU Modes Summary page |
| CPU summary data | No | CPU Process States page |
| Disk status data | No | Disk Status Summary page |
| Disk volume data | No | Disk Volume Summary page |
| I/O data | No | I/O Summary page |
| Lock contention data | No | Lock Contention page |
| Memory data | No | Memory Summary page |
| Node summary data | Yes | Node pane, Node Summary page, and the top pane of the CPU, Memory, and I/O pages |
| Page/Swap file data | No | I/O Page Faults page |
| Single disk data | Yes 1 | Single Disk Summary page |
| Single process data | Yes 2 | Data collection for the Process Information page |
You can choose additional types of data collection by selecting the Collect check box on the Data Collection page of the Customize OpenVMS... menu (Figure 6-4). A check mark indicates that data will be collected at the intervals described in Table 6-2.
| Interval (in seconds) | Description |
|---|---|
| Display | How often the data display is refreshed. |
| Event | If events occur related to the screen, how often data is collected. |
| NoEvent | If no events occur related to the screen, how often data is collected. |
You can enter a different collection interval by double-clicking the value; then delete the old value and enter a new one. If you change your mind and decide to return to the default collection interval, select one or more rows of data items: then click Use default values. The system displays the default values for all the collection intervals.
When you finish customizing your data collection, select one of the following options at the bottom of the page:
| Option | Description |
|---|---|
| OK | To confirm any changes you have made and exit the page. |
| Cancel | To cancel any changes you have made and exit the page. |
| Apply | To confirm and apply any changes you have made and not exit the page. |
When you select the Customize OpenVMS... menu option and click the Filter tab, the Availability Manager displays a page that allows you to display specific kinds of data by selecting check boxes. The types of data filters available are as follows:
Filters can vary depending on the type of data collected. For example, filters might be process states or a variety of rates and counts. The following sections describe data filters that are available for various types of data collection.
Each filter page contains the following note: "Changes to these settings will override the program default settings." This means that settings that are changed on the node level override settings made at the application and program (or GUI) level.
You can display the default values for the data items on the page at any time. To do this, select the item and click Use default values.
When you finish modifying a filters page, click one of the following options at the bottom of the page:
| Option | Description |
|---|---|
| OK | To confirm any changes you have made and exit the page. |
| Cancel | To cancel any changes you have made and exit the page. |
| Apply | To confirm and apply any changes you have made and continue to display the page. |
When you click CPU Filters on the Filter page, the Availability Manager displays the OpenVMS CPU Filters page (Figure 6-5).
Figure 6-5 OpenVMS CPU Filters Page
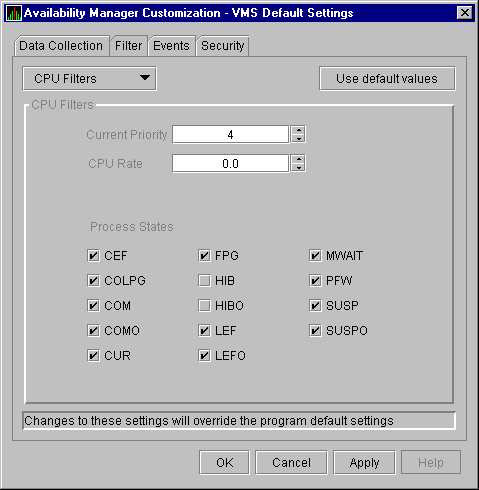
This page allows you to change and select values that are displayed on the OpenVMS CPU Process States page (Figure 3-7).
You can change the current priority and rate of a process. By default, a process is displayed only if it has a Current Priority of 4 or more. Click the up or down arrow to increase or decrease the priority value by one. The default CPU rate is 0.0, which means that processes with any CPU rate used will be displayed. To limit the number of processes displayed, you can click the up or down arrow to increase or decrease the CPU rate by .5 each time you click.
The OpenVMS CPU Filters page also allows you to select the states of
the processes that you want to display on the CPU Process States page.
Select the check box for each state you want to display. (Process
states are described in Appendix B.)
6.4.2 OpenVMS Disk Status Filters
When you click Disk Status on the Filter page, the Availability Manager displays the OpenVMS Disk Status Filters page (Figure 6-6).
Figure 6-6 OpenVMS Disk Status Filters Page
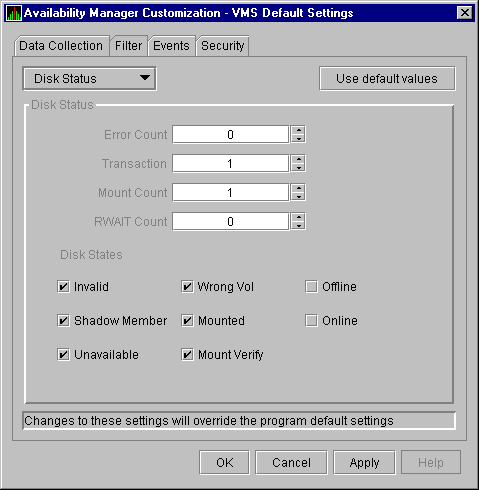
The OpenVMS Disk Status Summary page (Figure 3-12) displays the values you set on this filters page.
This filters page lets you change the following default values:
| Data | Description |
|---|---|
| Error Count | The number of errors generated by the disk (a quick indicator of device problems). |
| Transaction | The number of in-progress file system operations for the disk. |
| Mount Count | The number of nodes that have the specified disk mounted. |
| RWAIT Count | An indicator that a system I/O operation is stalled, usually during normal connection failure recovery or volume processing of host-based shadowing. |
This filters page also lets you check the states of the disks you want to display, as described in the following table:
| Disk State | Description |
|---|---|
| Invalid | Disk is in an invalid state (Mount Verify Timeout is likely). |
| Shadow Member | Disk is a member of a shadow set. |
| Unavailable | Disk is set to unavailable. |
| Wrong Vol | Disk was mounted with the wrong volume name. |
| Mounted | Disk is logically mounted by a MOUNT command or a service call. |
| Mount Verify | Disk is waiting for a mount verification. |
| Offline | Disk is no longer physically mounted in device drive. |
| Online | Disk is physically mounted in device drive. |
When you click Disk Volume on the Filter page, the Availability Manager displays the OpenVMS Disk Volume Filters page (Figure 6-7).
Figure 6-7 OpenVMS Disk Volume Filters Page
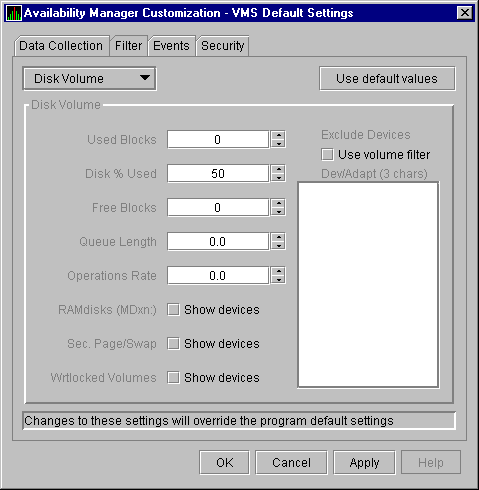
The OpenVMS Disk Volume Filters page allows you to change the values for the following data:
| Data | Description |
|---|---|
| Used Blocks | The number of volume blocks in use. |
| Disk % Used | The percentage of the number of volume blocks in use in relation to the total volume blocks available. |
| Free Blocks | The number of blocks of volume space available for new data. |
| Queue Length | Current length of all queues. |
| Operations Rate | The rate at which the operations count to the volume has changed since the last sampling. The rate measures the amount of activity on a volume. The optimal load is device specific. |
| Previous | Next | Contents | Index |
|
|
| privacy and legal statement | ||
| 6552PRO_007.HTML | ||